
Download
Contact Us
 Telephone:+860755-89505873
Fax:+860755-89504913
After-sales department:
+860755-89505873-8030 Ms Leung

- 413958458

- 13926598885
Users Manual
Dual-lens HD Car DV Camera
Source:未知
Writer:admin
Time:2012-10-10 11:07:13
Click:Loading...
Dual-lens HD Car DV Camera
l Product Accessories:
● Car DVR camera ● USB cable ● User manual CD
● Car charger ● a bracket ● a clip
l Picture & Button
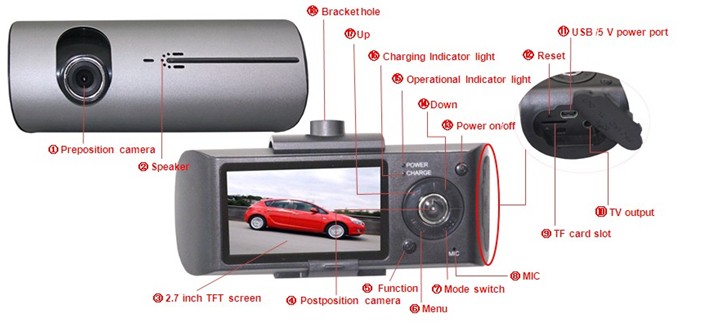
View Description:
1. Preposition camera 2.Speaker 3. 2.7 inch TFT screen
4. Postposition camera 5.Functions button 6. Menu button
7. Mode switch 8.MIC 9. TF card slot 10. TV output
11. USB/5V power port 12. Reset 13. Power on/off 14. Down 15. Operational Indicator light 16. Charging Indicator light
17.Up 18.Bracket hole
●Product Data:
1) Main function: Recording video & audio simultaneously, taking photos, dual-lens video & photo, lens rotation, vehicle travelling recording, automatically overwriting, preview, G Sensor, USB disk
2) Video format: AVI, Dual-lens:1920*720/1280*400; single lens: 1440*1080/1280*720/720*480 (optional)
3) Photo format: JPEG, dual lens 1920*720/1280*400, single lens: 5M/3M/1.3M,(optional)
4) External Memory: TF card 2GB-8GB, Max 32 GB
5) USB: 2.0(Hs)
6) Charging time: 2-3 hours
7) Using time: continuously recording for 1 hour with its built-in Li battery
8) Operation systems: No need for driver installation if the operating system is Windows ME/ 2000/ XP/ VISTA or above (Wndows98 is excepted)
l Operation
u Function setting
l Recording video mode:
Turn on the DVR, and short press the Menu button enter into the video output mode setting ,press Up/Down for the following setting, short press the Function button to confirm, after operation, press the Menu button to exit.
1) Video format: Dual-lens: 1920*720/1280*400; single lens: 1440*1080/1280*720/720*480
2) White balance: auto/sunlight/cloudy sky/ Tungsten/ fluorescent lamp
3) Cycling recording time: off/2/5/10 minutes optional (means save a video file automatically per 2/5/10 minutes)
4) Audio when recording: on/off, if choosing off, no audio when recording.
5) Video mode: A+B/A/B
l System mode:
Turn on the DVR, short press Menu button twice to enter into the system setting. Then short press Functions/Down for the following setting, short press the Functions button to confirm, press the Menu to exit setup after finished.
1) Time & date: before set the time, press Mode switch enter into the display mode of recording date and time, then press Up/Down (year / month / day, day / month / year, month / day / year), press Up/Down button to confirm the setting, press Mode switch button to save. Press Menu button to exit after finished.
2) Auto-power off: off/ 2mins/5mins/10mins
3) Button pressing sound: On/Off
4) Language: English/Simplified Chinese/Traditional Chinese/Spanish/French/
Portuguese/German/Japanese /Russian/Italian
5) Power frequency: 50Hz/60Hz (optional )
6) Formatting : SD card
7) Default setting: Yes/No (when choosing” Yes", the system will format memory card);
8) Fill in light: day/night mode
9) Date label: on/off
10) TV output: NTSC/PAL
11) Edition: BD75B12031601
l Taking photos mode:
Turn on the DVR, under the photo taking standby mode, press Menu button to enter into the photos setting ,and press Functions button enter into setting , then press Up/Down for the following setting,
1) Photo size: dual lens 1920*720/1280*400, single lens: 5M/3M/1.3M
2) White balance: auto/sunlight/cloudy sky/ Tungsten/ fluorescent lamp
3) Shooting mode: single shooting/Automatically shoot per 2s/ automatically shoot per 10s/ continuously shoot.
4) ISO: auto/100/200/400
5) Photo mode: A+B/A/B
u Switch on/ recording the video
Under turn off mode, press Power on/off to turn on the DVR, green light flashes simultaneously to start to record the video, that is, after turning on the DVR , system default is in the recording video mode. Press Function button, green light keeps on, video files are saved and back to video standby mode(under video mode, the screen displays current video resolution ratio, time & date, video mode & power size), please press Function button to repeat recording the video.
Attention:
1). before using the device, please insert the memory card, if not, screen will show “memory card wrong” after turned on the DVR.
2) When memory card is full, system will automatically delete the first video file, and continuously record to reach cycling recording function.
3) During recording, press power on/off button to shift single lens/dual lens, press up/down button to zoom in and zoom out. The max zoom is 4 times, min is 1:1.
u Taking photos
Under video standby mode, press Mode switch button once, there is a shooting sign on the top right corner of the screen, which means the current mode is shooting standby mode, press Function button, the screen flashes once, one photo has been taken and saved , and then the device comes back to shooting standby mode. If need more photos, please repeat the above operations.
Attention: during shooting, press power on/off button to shift single lens/dual lens, press up/down button to zoom in and zoom out. The max zoom is 4 times, min is 1:1
u Vehicle traveling data recording
Connected the device to your Car via the car charger, the device will record automatically when the car starts, green light flashes. When you disconnect the car charger, the device will automatically save the video files and turn off.
Attention:
1) The device turns off automatically, if need to turn on by manual, please press Power On/ Off button.
2) When connecting with car charger, the device will switch on automatically, the setting function works normally.
u Photo Browse and Delete
Turn on the device, under the viewfinder standby mode, press Mode switch button, the system enters into the file browse mode. At this moment, you can press up/down button to select the file browser, press Function button enter into full screen display. Press Up/Down button to choose other photos to browse; If need to delete files, press Menu button to enter into delete mode, press Up / Down button to select , and then press Function button to confirm deletion. If you want to format the disk, choose ”format” and press Function button to confirm, and long press Menu button to exit.
Video Browse and Delete
Turn on the device, under the viewfinder standby mode, press Mode switch button, the system enters into the video playback mode. At this moment, you can press up/down button to select the file browser, press short Function button enter into full screen display. Press Function button again to play/stop file, ress up/down button once to fast forward or backward. Press up/down button to choose last/ next video to play; If need to delete files, press Menu button to enter into delete mode, press Up / Down button to select, and then press Function button to confirm deletion. If you want to format the disk, choose ”format” and press Function button to confirm, and press Menu button to exit.
u Lens swift
Dual lens, preposition lens and postposition lens are one cycling mode.
Under standby mode, press power on/off to choose any lens mode to record video for your record demand.
Lens change sequence: Dual lens-- preposition lens -- postposition lens--dual lens
u Lens Rotation
The device have the preposition lens can be rotated with different angles for your demand, the lens can be rotated depend on screen.
Attention: when rotation, just use medium strength will be enough.
u G-sensor
The device has G-sensor function, it will record G-sensor’s horizontal coordinate X Y Z while recording, providing more car traveling info when playback the video. And when there is car crash, the device will save the 60 seconds video before and after the crash, and the it will not be overwritten.
u TV output
Connect the TV cable with the device’s USB port you will view the video and photo on TV, monitor.
u Switch off
Under standby mode, long press power on/off can turn the device off, at this moment, light turns off.
If the device is lack of power, the Screen will show the low power, then save the video and power off automatically.
u Charging
Under turn off or standby mode, charging with computer with USB cable, choose” storage”, at this moment , red light keeps on, indicating the device is charging. When it has charged fully, red light turns off, green light keeps on.
Connect the device with car charger, it will charge also.
Attention: when the device is lack of power, it will enter into protection mode and could not turn on the device. Please charge it
u Playback on computer
Under turn on or turn off mode, use USB to connect computer, click on the removable disk, select the files to playback. Please make sure computer has been installed the related software before playback on computer.
l Attentions
1. When continuously recording, system will generate a new video file after each operation, if set the time is 2mins/5mins/10mins each recording, the device will save the video as the set time.
2. Video/ photo/ preview is a cycling mode. At this time, screen display is different to distinguish different modes; if necessary, press mode switch button to enter directly into certain mode.
3. Connect to computer: the time for computer with different system or configuration to identify the hardware is slightly different. During this period, please wait for a moment. If computer can’t identify, please make sure your operating system, drivers and USB interface cable in good work order, then connect again.
4. Under a bright environment, keep the device and 50-centimeter distance from the scene and audio mode is within 40 square meters you want to record in order to achieve a best effect. This device hasn’t any anti-trembling function, so please hold the device stable.
5. As the device has built-in high-capacity polymer lithium battery, so it has a memory effect. We advise in the first 5 times of usage, charge the battery fully after the battery is out of use, so that the battery can work with its max working hours perfectly.
