
Download
Contact Us
 Telephone:+860755-89505873
Fax:+860755-89504913
After-sales department:
+860755-89505873-8030 Ms Leung

- 413958458

- 13926598885
Users Manual
User Manual of IR Waterproof Watch Camera
Source:未知
Writer:admin
Time:2012-10-09 17:45:00
Click:Loading...
User Manual of IR Waterproof Watch Camera
l Product Accessories
● Watch camera ● USB cable ● User manual CD
● MIC cover
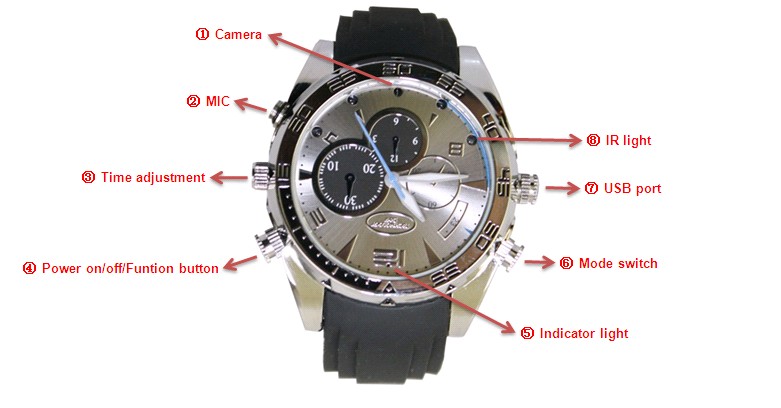
l Picture & Buttons
Technical Data
1) Main functions: recording video and audio at the same time, taking photos, recording audio alone, web camera, IR night vision waterproof function, watch, USB drive
2) Video format: AVI, 1920*1080 resolutions
3) Picture format: JPEG, 4032*3024 resolutions
4) Audio format: WAV
5) Internal memory: 2GB/4GB/8GB Max 32GB
6) USB interface: 2.0(Hs)
7) Charging time: about 3-4 hours
8) Battery use time: built-in Li battery, about 2 hours
9) Operation systems: No need for driver installation if the operating system is
Windows ME/ 2000/ XP/7/vista or above (Windows98 is excepted).
u Operation
u Switch on / Recording video and audio
Long press the power-on/off/function button for some seconds, blue light and red light keep on for 10 seconds, then blue light turns off after flashing three times and it enters into recording mode. Under the recording situation, shortly press the power-on/off /function button twice, blue light keeps on. The video file is saved and the device is back to standby mode. Shortly press the same button again to restart recording.
Attention:
1. Under the continuous recording, to confirm file’s safety. System will automatically save the files every 20 minutes.
2. In order to save the power, the indicator light keeps off while recording and it is still recording at the same time. Shortly press any button to light up the indicator and confirm the recording situation or start new operation.
u IR light
Under the video recording state, Long press mode switch button for some seconds, red light flashes 3 times and turns off ,and it is IR recording situation now; Shortly press the mode switch button ,blue light flashes 3 times and IR light turns off, and back to normal recording condition.
Attention: IR light only can be turned on under the video recording condition.
u Taking photo
Under video standby mode, shortly press Mode switch button once, red light keeps on. It comes into photo taking standby mode. Shortly press power-on/off/function button, red light will blink once. One photo will be taken and saved, then back into standby mode.
u Recording audio alone
Press Mode switch button two times under video mode, red and blue light keeps on and enters into audio alone-taking standby mode. Press the power on/off/function button, red light and blue light flash slowly, it starts to take audio alone. Press the same button again, red and blue light keep on. The audio file is saved and back into audio alone-taking standby mode.
Attention: to ensure a good recording effect, please don’t hold off the MIC hole.
u Charging
Under power-off mode, connect camera to computer via USB cable. Red light and blue light keep on while being charged. When blue light turns off and red light keeps on, it shows the camera is fully charged.
u Reset
Press Power on/off/function button and Mode switch button at the same time to reset when camera cannot work normally.
Attention: When recording video and audio or take audio alone, if you reset directly, the video or audio file won’t be saved.
u Playback video
After video/audio recording and taking photo, under Power off mode, then connect device to computer via USB cable and play back video on computer. Please make sure there is the playback software in the computer before connecting.
u Switch off
Under any mode, long press Power on/off /function button, red light flashes 3 times and then it powers off.
Attention: To turn off in this way, the video and audio file will be saved
automatically before power off.
u Web camera
The device can be used as web camera. Install driver software:"STK03N.exe" in the user manual CD before use. Then connect it to the computer under power on mode. At this time, the computer will appear a standard web camera to use.
Attention: Owing to there is no automatic discharge function by this drive, the system will discharge drive as default, when install the drive even-number. At the same time some drive files will be deleted and PC camera can’t be used. In this case reinstall the drive to work normally.
u Setting time
It can display the recording date and time on the video and photo, you can set it as follows:
1) Create a file named “Time.TXT”, edit it according to the format “2010.12.12 12:12:12”
2) Copy the file to the root of the disk of the camera and pull the camera out of computer.
3) When starting the camera again next time, the time will be reset and updated.
u Attention
1) When taking video continually, the system will automatically generate a new video file after each operation.
2) Please check whether it is low power, if it cannot turn on. While low power, red light flashes 10 times, save the file automatically and turn off.
3) In order to obtain better sound effect, use the MIC cover with hole when taking video or audio alone. Besides the machine is attached with IR lens and 4 IR lights. According to video environment, you could choose to turn on the IR light to make good night vision.
4) Connect to computer: The time for computer with different system or configuration to identify the hardware is slightly different. During this period, please wait for a moment. If computer can’t identify, please make sure your operating system, drivers and USB interface cable are in good order. Then connect again.
5) The device has memory function by using built-in high-capacity polymer lithium battery. Please charge the battery fully after you have used out the battery first five times. By doing so, you can access the maximum capacity of the battery, reaching the standard working hours.
6) When the memory capacity isn’t enough, the red and blue light will flash for 5 seconds at the same time. The camera will save the file automatically then power off. If need to continue to record, spare some capacity firstly.
