
Download
Contact Us
 Telephone:+860755-89505873
Fax:+860755-89504913
After-sales department:
+860755-89505873-8030 Ms Leung

- 413958458

- 13926598885
User Manual of HD Remote Control Sunglasses Camera JVE-HD02
Source:未知
Writer:admin
Time:2013-03-22 18:14:16
Click:Loading...
User Manual of HD Remote Control Sunglasses Camera
1、Product Accessories
●Sunglass camera ●Remote Control ●USB Cable ● Charger
● User manual CD ● A Clip ● Spectacle Case & Glass Cloth
● A Piece of Spare Glass ●Anti-slip Mat for Nose-touch
2、Pictures & Buttons
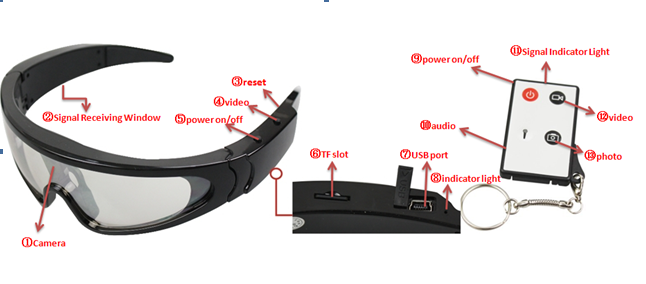
Glasses: 1.Camera 2.Signal Receiving Window 3.reset 4.Video 5. Power on/off 6.T F Slot 7.USB port 8.indicator Light
Remote Control: 9.Power on/off 10.Audio11.Signal Indicator Light12.Video
13. Photo
3、Product Features
Main Functions: recording video and audio, recording audio alone, taking photo, remote control, web camera, USB drive, sunglass
●Video format: AVI,1280*720
●Photo format: JPEG,2560*1920
● Audio format: WAV
● External memory: 2GB-16GB
● USB: 2.0(Hs)
●Charging time: 2.5-3 hours
● Battery use time: polymer lithium battery can continuous working about 2 hours
● Operation system: no need for driver installation if the operation is Windows XP/2000/ME/Vista or above (Windows 98 excepted)
4、Operation
Please insert Micro SD or TF card before power on. If not, it will power off automatically after blue light blinking 3 minutes.
Because the device is remote control HD sunglasses camera, this product can be operated through button operation or remote control, but you can just conduct the functions of Power off/on or Recording via sunglass buttons.
Attention: when you conduct the remote control, please make the remote control aiming at signal receiving window to assure effectiveness of remote control.
Attention: under standby mode, the device will power off automatically without any operations about 3 minutes.
time, please recharge the battery first before use it.
Create a file named “TIME.txt”, edit it according to the format “2011.01.01 20:00:00”
Then copy the file to the root of the disk of the camera and pull the camera out of computer. When restarting the device, the time will be reset and updated.
5、Attention:
1、The system will turn off automatically when no operation within 3 minutes under standby mode.
2、The system will save the file firstly then turn off if the power is low when taking video.
3、When taking video continually, the system will automatically generate a new video file after each operation.
4、In the adequate light environment, keep the DV vertical and stable, you can get best video and images within a certain distance.
5、Connection to PC: The time of PC recognizing the device is different according to its different system and configuration, so please not operate during recognizing. If the device can’t be recognized, please check your computer’s operation system, device drivers, USB port and the USB cable is normal, and then connect the hardware again.
6、Please press it slightly when reset the device, otherwise the components will be damaged
1、Product Accessories
●Sunglass camera ●Remote Control ●USB Cable ● Charger
● User manual CD ● A Clip ● Spectacle Case & Glass Cloth
● A Piece of Spare Glass ●Anti-slip Mat for Nose-touch
2、Pictures & Buttons
Glasses: 1.Camera 2.Signal Receiving Window 3.reset 4.Video 5. Power on/off 6.T F Slot 7.USB port 8.indicator Light
Remote Control: 9.Power on/off 10.Audio11.Signal Indicator Light12.Video
13. Photo
3、Product Features
Main Functions: recording video and audio, recording audio alone, taking photo, remote control, web camera, USB drive, sunglass
●Video format: AVI,1280*720
●Photo format: JPEG,2560*1920
● Audio format: WAV
● External memory: 2GB-16GB
● USB: 2.0(Hs)
●Charging time: 2.5-3 hours
● Battery use time: polymer lithium battery can continuous working about 2 hours
● Operation system: no need for driver installation if the operation is Windows XP/2000/ME/Vista or above (Windows 98 excepted)
4、Operation
Please insert Micro SD or TF card before power on. If not, it will power off automatically after blue light blinking 3 minutes.
Because the device is remote control HD sunglasses camera, this product can be operated through button operation or remote control, but you can just conduct the functions of Power off/on or Recording via sunglass buttons.
Attention: when you conduct the remote control, please make the remote control aiming at signal receiving window to assure effectiveness of remote control.
- Button operation
- Power on
Attention: under standby mode, the device will power off automatically without any operations about 3 minutes.
- Recording video and audio
- Power off
- Remote Control
- Power on
- Video
- Photo
- Recording audio alone
- Power off
- connect to computer
- USB drive
- webcam
- Battery and charge
time, please recharge the battery first before use it.
- Time setting
Create a file named “TIME.txt”, edit it according to the format “2011.01.01 20:00:00”
Then copy the file to the root of the disk of the camera and pull the camera out of computer. When restarting the device, the time will be reset and updated.
- Reset
5、Attention:
1、The system will turn off automatically when no operation within 3 minutes under standby mode.
2、The system will save the file firstly then turn off if the power is low when taking video.
3、When taking video continually, the system will automatically generate a new video file after each operation.
4、In the adequate light environment, keep the DV vertical and stable, you can get best video and images within a certain distance.
5、Connection to PC: The time of PC recognizing the device is different according to its different system and configuration, so please not operate during recognizing. If the device can’t be recognized, please check your computer’s operation system, device drivers, USB port and the USB cable is normal, and then connect the hardware again.
6、Please press it slightly when reset the device, otherwise the components will be damaged
