
Download
 Telephone:+860755-89505873
Fax:+860755-89504913
After-sales department:
+860755-89505873-8030 Ms Leung

- 413958458

- 13926598885
Product Accessories
● Ski goggles camera● USB cable ● Charger
● User manual CD● a clip ● Glasses bag and cloth
- Picture & Buttons
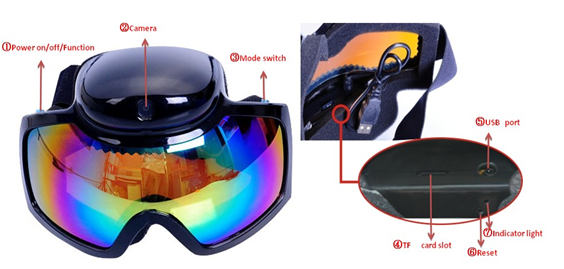
- Power on/Off/Function button 2. Camera 3. Mode switch
4. SD/TF card slot 5. USB port 6. Reset 7. Indicator light
Technical Data
- Main functions: recording video & audio simultaneously, taking photos, recording audio alone , USB drive, Ski goggles
- Video format: AVI, 1280*720
- Photo format: JPEG, 1600*1200
- Audio format : WAV
- External memory: Max 32GB
- USB: 2.5’ USB port
- Charging time: 4-5 hours
- Battery use time: Polymer Li battery. can use 2 -3 hours continually
- Operation systems: No need for driver installation if the operating system is Windows ME/ 2000/ XP/2003/ Vista/Mac OS10.4
- Operation
Before switch on, insert the External Micro SD/TF card. Please insert the memory card with metal side towards the glasses. When switch on device without SD card, the blue light keeps on, then it switches off after 3 minutes.
- Switch on/Recording video and audio
Under power off mode, short press the Power on/Off/Function button, blue light keeps on for several seconds, then keeps flashing slowly, the camera comes into the recording video mode. When device is recording video, the system will save a video file automatically every 20 minutes. Press the Power on/Off/Function button again, blue light keeps on, device stops recording and saves video file, comes into the mode of standby.
- Taking Photo
Under standby mode, short press Mode switch once, device shocks once and keeps blue light on, the camera enters into taking photo mode, short press Power on/Off/Function button, device shocks once, blue light flashes once, indicating one photo is taken and saved and the camera returns to standby mode.
- Recording audio alone
Under taking photo standby mode, short press Mode switch button the 2nd times, the device shocks once, it enters into recording audio alone mode. Short press the Power on/Off/Function button, it shocks 3 times, and the blue light keeps flashing fast, the camera are in recording audio alone mode. Short press the Power on/Off/Function button, the blue light keeps on, the audio file is saved, it backs to standby mode.
At this time, the third times short press Mode switch button, device shocks twice and blue light flashes slowly, it comes into recording video mode.
- Playback
When device is under switch off or standby mode, connect the camera to the computer with a USB data cable, click on removable disk, and select the video file you can double-click the computer to play.
Note:
1. If the device can’t be recognized or there is no signal of removable disk show up after 30 seconds after you connect with the computer, please connect the computer again.
2. We suggest that you could copy or cut the video files to your computer hard disk to playback, it is possible that the video could not play smoothly, because the data size is too big to play on this device memory.
3. Please confirm your computer had installed the play software before you connect it with computer. ,
- Reset
Insert the pin into the RESET hole to restart the device once it does not work normally under incorrect operations. Please tap the reset hole slightly via clip to finish reset. At this time, the device at switch off mode.
Note: Under recording video mode, if you shut down the camera by reset button, video files will not be saved.
- Charging
Under power off/standby mode, connect the camera to the computer via a USB cable, blue light keeps on, indicating the camera is under charging.
To charge the device by charger ,the red light on the charger keeps on ,then it is under charging; when red light keeps off, green light keeps on, it is fully charged.
The camera built-in high capacity lithium polymer battery, have a memory effect, so the initial use of the first five times, please use up the battery capacity. and then charge the battery to active the battery maximum capacity, which could acquire the standard working hours.
- Setting time
- Connect the camera to computer via USB cable
- Insert the manual CD, open the disk and edit a file named SETCLK.txt
- Click SETCLK.txt to update the current date and time, The format of time is :2011-2-3 8:9:6
- Attention
- For saving the battery, device will switch off automatically after if no any operations in 3 minutes.
- When it is recording, if power is low, the system will first save the video content first, then automatically shut down.
- Please confirm the battery, whether there is electricity in it before use device ,if there is not , please charge it.
- When the memory inventory is full, the indicator light keeps on, the system will first save the video content first, then automatically shut down. Please copy the files in the memory card then empty the memory card if you still want to use it.
- Please keep the camera in brighter environment, to maintain the camera vertical and stable, and keep the review within a certain distance to obtain better effect.
- The time of PC recognizing the device is different according to its different system and configuration, so please not operate during recognizing. If the device can’t be recognized, please check your computer’s operation system, device drivers, USB port and the USB cable is normal, and then connect the hardware again.
- Remember that please tap the reset hole slightly via clip to protect other components.
