
Download
Contact Us
 Telephone:+860755-89505873
Fax:+860755-89504913
After-sales department:
+860755-89505873-8030 Ms Leung

- 413958458

- 13926598885
Users Manual
User Manual of Flashlight Camera
Source:未知
Writer:admin
Time:2012-10-10 10:01:19
Click:Loading...
User Manual of Flashlight Camera
| Product Accessories | ||||
| ● Flashlight Camera | ● USB Cable | ● User | Manual | CD |
|
● Bracket Picture & Buttons |
● Charger | ● A clip | ||
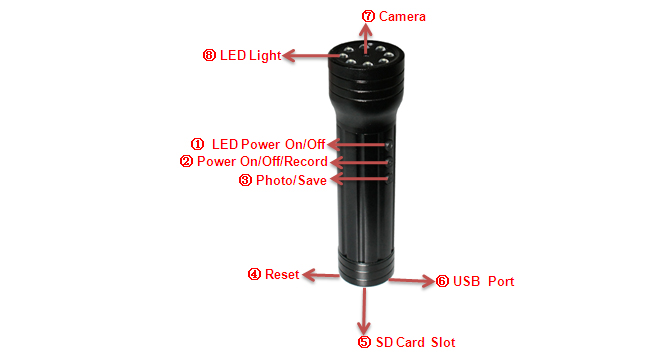
1. LED Power On/Off 2. Power On/Off/Record 3. Photo/Save 4. Reset
5. SD Card Slot 6. USB Port 7. Camera 8. LED Light
l Technical Data
1) Main Functions: recording video & audio at the same time, taking photo, USB
drive, flashlight, night vision, web camera
2) Video: AVI, 720*480 resolution
3) Photo: JPEG, 1280*1024 resolution
4) Support Micro SD card/TF card:1GB-8GB(optional)
5) USB: 2.0(Hs)
6) Charging time: 3-4 hours
7) Battery use time: built-in Li battery, recording video & audio for about 3 hours
8) Operation systems: No need for driver installation if the operating system is
Windows ME/ 2000/ XP/ Vista or above (Windows98 is excepted)
l Operation
u Inserting SD card
Rotary to open the rear cover of the flashlight, insert the Micro SD card/TF card into the SD card slot. When inserting, make sure the side with metal face to the USB port. Note: when power on without SD card, the red light keeps blink quickly, the device will power off automatically within 15 seconds.
u Switch on
Under power off mode, press the power on/off button once, blue light of ③ button
turns on and turns off some seconds later, reds light of ①、② buttons turn on at the same time, which indicates the camera comes to standby mode.
u Recording video and audio
1) Under standby mode, press power on/off/record button once, red lights of ①、②
buttons keep on, blue light of ③ keeps blinking, which indicates it is recording.
2) Press power on/off/record button again, blue light of ③ blinks quickly then turns off, while red lights of ①、② button keep on, indicating it stops recording and save the
recording data then returns to standby mode.
Note: when it is recording, it will save the video file every 5 minutes. When the memory is full, the new video file will replace the oldest file to continuously record.
u Taking photo
Under standby mode, press power photo/save button one time, blue light of ③ button
blinks three times then turn off, which indicates one photo is taken and saved. If you want to take more photos, just repeat the same operation.
u Switch off
1) Under any mode, press the power on/off/record button for some seconds, all the lights are off, indicating it is power off.
2) Under any mode, press the reset button once softly with a clip, all the lights are off, indicating it is power off.
Attention: When it is recording, press power on/off/record button for some seconds,
the device will save the video file then power off. If pressing the reset button with a clip, the video file won’t be saved.
u Lighting
Under any mode, press LED switch button once, the LED is on, press LED switch button again, the LED is off.
u Reset
Under incorrect operation or a certain reason, the device may stop working, at this time, insert the clip into the reset hole to reset, the device is at power off mode. Note: when resetting, please click that hole softly, in case of breaking the device.
u Charging
1) Under power off or standby mode, connect the camera with computer via USB
cable and charge it. red lights of ①、② blink slowly. Red lights of ①、② keep on when it is fully charged.
2) Being charged by the charger, the green light of the charger keeps on. The green light turns off when it is fully charged.
Note: when the device is run out of battery, the device will power off automatically. please charge it on time, when it is fully charged, please take it away from the power on time, in order to avoid breaking the battery.
u Playback
Connect the camera to computer via USB cable to playback the files. Red lights of
①、② keep on. Before connecting, please make sure the computer has been installed
the related player software.
u Setting Time
When using the device for the first time or the time error, you can reset the time as the following method:
1) Connect the camera to computer via USB cable
2) Create a file named ”TAG.txt” follow the format: The first line: [date]
The second line: 2010/03/25
The third line: 12:12:12
3) Copy the file into root disk of the camera, the time of camera will be updated when you pull it out of computer and restart it again.
u Web camera
1) Install the software named SPCA1528_V2220_MultiLan.exe in the manual CD
2) Insert SD card into the camera, connect the camera to computer via USB cable, it shows USB drive mode, then press the power on/off button once to web camera mode.
3) Click icons of computer in sequence:

“Amcap”, then click “Options” and find its subfile “Preview”, the web camera works.
Note: without SD card, web camera function is unworkable.
u Attention:
1) When recording, if it is lack of electricity, the device will save the data then power off automatically.
2) The device will shut down automatically without any operation within 15 seconds under standby mode.
3) When last recording, every operation later, the device will create a new video file automatically.
4) This device need Micro SD card to save the files, so please insert a Micro SD
card to the SD slot before starting.
5) The time of PC recognizing the device is different according to its different system
2) Being charged by the charger, the green light of the charger keeps on. The green light turns off when it is fully charged.
Note: when the device is run out of battery, the device will power off automatically. please charge it on time, when it is fully charged, please take it away from the power on time, in order to avoid breaking the battery.
u Playback
Connect the camera to computer via USB cable to playback the files. Red lights of
①、② keep on. Before connecting, please make sure the computer has been installed
the related player software.
u Setting Time
When using the device for the first time or the time error, you can reset the time as the following method:
1) Connect the camera to computer via USB cable
2) Create a file named ”TAG.txt” follow the format: The first line: [date]
The second line: 2010/03/25
The third line: 12:12:12
3) Copy the file into root disk of the camera, the time of camera will be updated when you pull it out of computer and restart it again.
u Web camera
1) Install the software named SPCA1528_V2220_MultiLan.exe in the manual CD
2) Insert SD card into the camera, connect the camera to computer via USB cable, it shows USB drive mode, then press the power on/off button once to web camera mode.
3) Click icons of computer in sequence:
“Amcap”, then click “Options” and find its subfile “Preview”, the web camera works.
Note: without SD card, web camera function is unworkable.
u Attention:
1) When recording, if it is lack of electricity, the device will save the data then power off automatically.
2) The device will shut down automatically without any operation within 15 seconds under standby mode.
3) When last recording, every operation later, the device will create a new video file automatically.
4) This device need Micro SD card to save the files, so please insert a Micro SD
card to the SD slot before starting.
5) The time of PC recognizing the device is different according to its different system
and configuration, so please not operate during recognizing. If the device can’t be recognized, please check your computer’s operation system, device drivers, USB port and the USB cable is normal, and then connect the hardware again.
6) In the adequate light environment, keep the D V vertical and stable, you can get
best video and images within a certain distance.
7) As the device has built-in high-capacity polymer lithium battery, so it has a memory effect .We advise in the first 5 times of usage, charge the battery fully after the battery is out of use, so that the battery can work with its max working hours perfectly.
