
Download
Contact Us
 Telephone:+860755-89505873
Fax:+860755-89504913
After-sales department:
+860755-89505873-8030 Ms Leung

- 413958458

- 13926598885
Users Manual
User Manual of Alarm Clock Camera
Source:未知
Writer:admin
Time:2012-10-10 10:19:02
Click:Loading...
User Manual of Alarm Clock Camera
l Product Accessories
● Clock camera ● USB cable ● User manual CD ● Charger ● Remote control
l Picture & Buttons
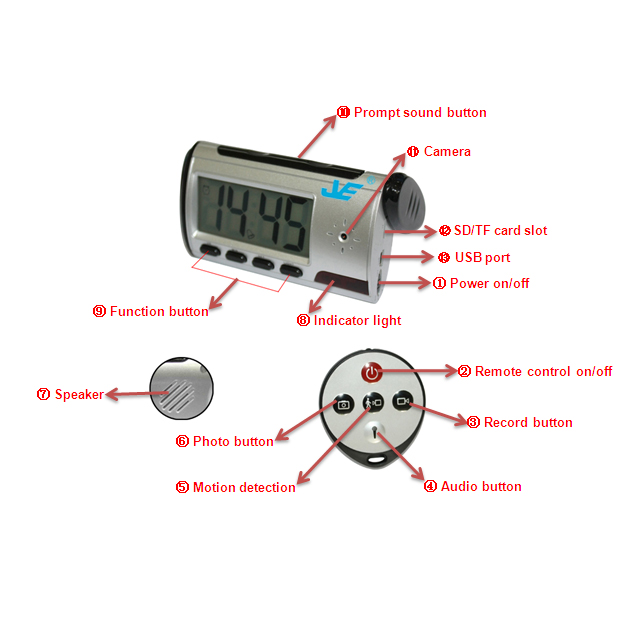
1. Power on/off 2. Remote control on/off 3. Record button 4. Audio Button
5. Motion detection 6.Photo button 7.Speaker 8. Indicator light
9. Function button (HR, MIN, SET, LIGHT) 10.Prompt sound button 11.Camera 12.SD/TF card slot 13. USB port
l Technical Data
1) Main function: recording video and audio by Remote control & Motion detection, taking photo, recording audio alone, alarm clock, webcam, USB drive
2) Video format: AVI, 640 * 480
3) Image format: JPEG, 1600 * 1200
4) Audio format: WAV
5) External memory: SD / TF card, 2GB-8GB Max.32GB
6) USB: 2.0 (Hs)
7) Charging time :5-6 hours
8) Battery: built-in high-capacity polymer lithium battery, can work for 6 hours
9) Operating System: Windows ME/2000/XP/Vista or more versions of the operating system without installing driver (Windows98 system needs to install the driver)
l Operation
u Alarm clock
1) Press “Set” button under the Time mode to set as per the following sequences (the display will flash simultaneously):
Time setting → Alarm setting → On-the-hour alarm setting
2) Under the Time Setting mode, press “HR” button to set hour, press “MIN” button to set minute.
3) Under the Alarm Setting mode (Symbol:
4) Under the On-the-hour Alarm Setting mode (the symbol of alarm and the on-the-hour alarm will flash):It will open and close the function (Symbol:
5) Under the Time Mode, press the “HR” button, it can shift the hour system (12/24 hour system); press “MIN” button, it can select the alarm ring music.
6) Under any modes, turn on or turn off the background light by pressing the “LIGHT” button.
7) Under any modes, it can report the time by pressing the prompt sound button.
u Insert SD card
Before switching the clock, open the covert on the right side, insert the SD card.
u Switch on
Push power on button to “ON”, press remote control on/off button, the blue light is on, it is the standby mode.
Note: if there is no any operation during 3 minutes, the device will switch off automatically.
u Recording video and audio by Remote control
Under standby mode, press the record button, the blue light flash three times and turn off. It starts to record video. Press the record button again, the blue light will turn on and keep on, it means that the video have been saved and come to standby mode.
Note: when it is recording, it will save the video file every 20 minutes
u Recording audio alone
Under standby mode, press the audio button, the blue light flash two times and turn off, it starts to record audio. Press again, the blue light will turn on and keep on, it means the audio have been save and come to standby mode.
u Taking photo
Under standby mode, press the photo button, the blue light flash one time, one photo have been save and come to standby mode.
u Recording video and audio by motion detection
Under standby mode, press the motion detection button, the blue light flash quickly, indicating it comes to motion detection recording mode. When the camera is moving or the video targets are moving, it starts to record automatically, the blue light flash two times slowly and turn off. Press the motion detection button again, the blue light turn on and keep on, it means that the video have been saved and come to standby mode.
Note: when it is recording, it will save the video file every 3 minutes
u Switch off
Under any mode, push the power on/off button to “off” side.
Note: Please save the video before switching off.
u Reset
When the product can’t work because of incorrect operation or other unknown cause, you need to reset the product. Push the power on/off button to “off” side, and then push to “on” side, the camera can work normally.
u Charging
Switch off the camera, connect the camera with computer or charger, red light keep on while being charged, when fully charged, red light turns off.
Note: when the power is low, the blue light continuously and LCD can’t be seem clearly, please kindly charge it in time.
u Playback
Under power on mode, connect the camera to computer via USB cable and play back video on computer. Press the remote control on/off button, the blue light will be on, then the removable disk symbol will appear, you can play the video in your computer. Please make sure there is playback software in the computer before connecting.
u Setting time
When playback the video file, the device will show the recording time on the right corner of video. Please set time as follows:
1) Insert the user manual CD into the computer
2) Click update time tool”WriteTime.exe”
3) Click “Update”, the time will be the same as your computer
4) If you want to change the time, just adjust the time of computer
u Use as a Web Camera
The camera can be use as web camera. Before using it please install the STK02N 2.0.exe which is included in the user manual CD.
Under power on model, connect the camera to computer; then it can be used as a web camera.
Note: as this web camera driver has no automatic uninstalling function, when installing this driver for even times, the system will default to uninstall the driver, then the device will remove some driver files, so that web camera can not be used, when this happens, please reinstall the driver, it will work again.
l Attention
1) When recording, if power is low, the blue light flashes quickly, the system will save the video firstly, then turn off automatically.
2) When taking video continually, the system will automatically generate a new video file after each operation.
3) When memory is full, the blue light will flash quickly and turn off, and the video will be saved automatically before switching off.
4) Please keep the camera in brighter environment, to maintain the camera vertical and stable, and keep the review within a certain distance to obtain better effect.
5) Connected to the computer: the time for computer with different system or configuration to identify the hardware is slightly different. During this period, please wait for a moment. If computer can’t identify, please make sure your operating system, drivers and USB interface cable in good work order, then connect again.
6) As the device can work while being charged. But we advise in the first 5 times of usage, charge the battery fully after the battery is out of use, so that the battery can work with its max working hours perfectly.
