
Download
Contact Us
 Telephone:+860755-89505873
Fax:+860755-89504913
After-sales department:
+860755-89505873-8030 Ms Leung

- 413958458

- 13926598885
Users Manual
User Manual of Mini DV Camera
Source:未知
Writer:admin
Time:2012-10-10 10:25:43
Click:Loading...
User Manual of Mini DV Camera
l Product Accessories
● Mini DV camera ● USB cable ● User manual CD
● A lanyard
l Picture & Buttons
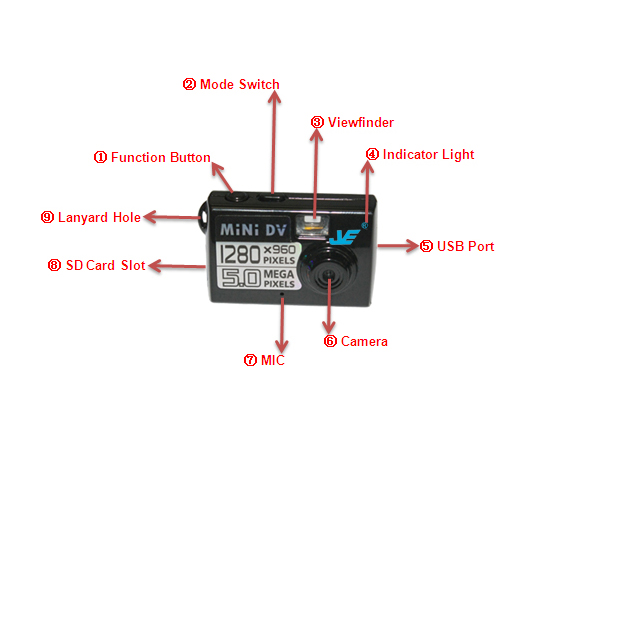
1. Function Button (On / Off / Photo / Video / Motion detection / Save)
2. Mode Switch Button(Taking photo/ Recording audio alone) 3. Viewfinder
4. Indicator Light 5. USB Port 6. Camera 7. MIC 8.SD Card Slot 9. Lanyard Hole
l Technical Data
1) Functions: recording video and audio by Manual & Motion Detection, taking photo, recording audio alone, , webcam, USB drive
2) Small & fashion design, with a variety of portable tools
3) Video: AVI,1280*960 resolution
4) Photo: JPEG, 2048*1536 resolution
5) Audio: WAV
6) Memory: SD/TF card, 1GB-8GB
7) USB: 2.0(Hs)
8) Charging time: 2~3 hours
9) Battery use time: built-in Li battery, 1 to 2 hours
10) Operation systems: No need for driver installation if the operating system is Windows ME/ 2000/ XP/ Vista or above (Windows98 is excepted)
l Operation
u Insert card
Insert a SD/TF card before using it, make sure the SD/TF card’s metal side face the camera.
u Switch on
Under power off mode, long press the function button, blue light keeps on for 5 seconds then goes out, red light keeps on, the camera is under standby mode.
Note: No card inserted when start the camera, blue light and red flash quickly at the same time for 5 seconds then off, the camera back to power off mode automatically.
u Recording by Manual
Under standby mode, press the function button once, red light keeps flashing slowly, the camera comes into manual recording mode, press the function button once again, red light keeps on, indicating the camera is back to standby mode. For continuous recording, repeat the above operation.
u Recording by Motion Detection
Under standby mode, long press function button for 2 seconds, red light and blue light keep on, while there are objects moving, blue light keeps on and red light flashes slowly, indicating the camera comes into motion detection mode, short press function button, red light and blue light keep on, indicating a video file is saved and the camera back to standby mode.
u Taking photo
Under standby mode, press mode switch button once, blue light keeps on, the system will switch to photo mode, short press function button, blue light flashes once, three
photos are taken and saved at the same time automatically. The camera back to standby mode. Repeat the above operation for more photos.
u Recording audio alone
Under standby mode, short press mode switch button once (that is to say, the second time press the mode switch button after starting the camera), red light and blue light keep on at the same time, it shows the camera switches to recording audio alone standby mode, short press function button, red light keeps on and blue light keeps flashing slowly, it shows the camera is recording audio alone, short press the function button again, a sound file is saved and the camera backs to the standby mode.
u Mode Conversion
Video, photographs, recording audio - cycle mode, the work light show different ways to distinguish among different modes; if need to come into a mode, press the function button for 2 seconds to record by motion detection, to enter into the other modes, just press mode switch to enter.
Note: under a mode, press the function button to save the file first, then mode switch button to switch function, otherwise the files cannot be saved timely.
u Reset
Reset the camera when incorrect operation or other reason, just press the Function Button and Mode Switch Button at the same time, the camera will be power off.
Attention: reset while recording, the current video will not be saved.
u Switch off
Under any standby mode, long press function button, red light and blue light turn off at the same time, the equipment has been shut down.
u Charging
Under power off mode, connect the camera with a USB cable to computer, when the battery is under charging state, blue light keeps on, red light keeps flashing slowly; when the battery is fully charged, red light and blue light keep on.
u Playback
After recording, under power off or standby mode, with a USB cable to connect the computer, click on removable disk to playback. Before connect computer, ensure that the relevant player software is already installed.
u Setting time
1) Connect the camera to computer
2) Create a new “Time.txt” file
3) Edit time as format: 2010.12.12 12:12:12 Y in the file (Attention space between year month day and hour second second, and "Y", the "Y" means the time showing)
4) Copy the file to the root disk of the camera
5) When starting the camera again next time, the time will be reset.
u Used as Web camera
This equipment can be used as a web camera, the driver software PC camera driver.exe, must be installed into computer first. Under power on mode, insert the USB cable to connect with computer, you can access to the web camera mode, click PC Cam icon, you can use its web camera function.
l Attention
1) The camera will automatically shut down as below:
u When power is low while the camera is recording, red and blue light flashing alternately for 5 times, the camera will save the videos first, then shut down automatically.
u When the SD memory card is full, the red and blue lights blink 5 times at the time, the camera will save the videos first, then shut down automatically.
2) In case of continuous recording, the system will automatically generate a new video file after every single operation
3) Connected to the computer: time identify for different computer configuration or system is different, under this period, do not carry out any operation, so as not to affect the hardware identification. If still can not be identified by computer, verify that your operating system, drivers, USB interface cable is all normal, and then re-connect.
4) Under adequate lighting environment, maintain the camera vertical stability, and keep target things about 50cm distance, the recording and photo will be natural colors, clear and stable picture images; Besides, this device does not have anti-shake function, keep the camera stable when recording or taking photo.
5) The camera has built-in high-capacity polymer lithium battery, a memory effect, so for the initial 5 times usage, running out of battery then charge it with full capacity to activate the battery maximum capacity, access to standard working hours.
