
Download
Contact Us
 Telephone:+860755-89505873
Fax:+860755-89504913
After-sales department:
+860755-89505873-8030 Ms Leung

- 413958458

- 13926598885
Users Manual
User Manual of Car DVR Camera
Source:未知
Writer:admin
Time:2012-10-10 11:02:57
Click:Loading...
User Manual of Car DVR Camera
l Product Accessories
l Car DVR camera ● USB cable ● User manual CD
l Car charger ● Mount ● Charger
l AV out cable
l Picture & Button
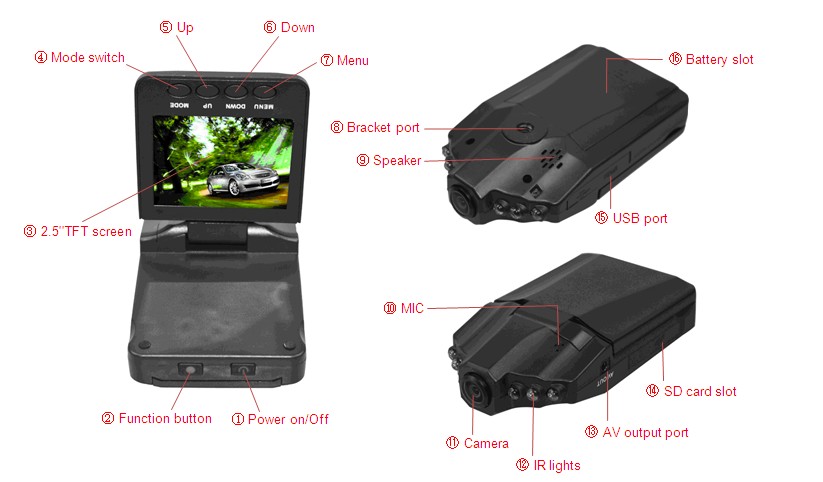
1. Power on/off 2. Function button 3. 2.5 inch TFT screen 4. Mode switch 5. Up 6. Down 7. Menu 8. Bracket port 9.Speaker 10. MIC 11. Camera
12. IR lights 13. AV outport port 14. SD card slot 15.USB Port 16.Battery slot
l Product Data:
This product has rotated TFT screen, 270 degree rotation screen is of help for video & photo taking with different angles easily.
1) Main function: Recording video and audio simultaneously, taking photos, recording audio alone, vehicle travelling recording, IR night vision, recording while charging, play back, Av out, cycle recording, USB disk
2) Video format: [HD] 1280*720/ [720] 720*480/ [640] 640*480
3) Photo format: JPEG, 3264*2448,2592*1944,2048*1536,1280*1024
4) Audio format: WAV
5) Screen: 2.5 inch HD TFF screen
6) Internal Memory: SD card 2GB-8GB , Max 16 GB
7) USB: 2.0(Hs)
8) Charging time: 6-7 hours
9) Using time: 2-3 hours
10) Operation systems: No need for driver installation if the operating system is Windows ME/ 2000/ XP/ VISTA or above (Wndows98 is excepted)
l Operation
Recording video mode:
Turn on the DVR, and press the Mode switch button up to video mode, press Menu to enter into the video mode/system mode setting and press Up/Down for the following setting, press the Function button to confirm:
1) Video format: [HD] 1280*720/ [720] 720*480/ [640] 640*480
2) Recording video timestamp: off/on (when choosing “off”, the video files will not show the recording time and date)
3) Cycling recording: On/Off (when choosing “On”, the recording files will cycle recording.)
4) Cycling recording time: 1/2/3/4/5 minutes optional.
5) Audio when recording: on/off, if choosing off, no audio when recording.
6) Power off timely: off/10 minutes/20 minuntes optional.
After operation, short press the Menu button to exit.
l System mode:
Turn on the DVR, and press the Mode switch button up to video mode, press Menu to enter into the video mode/system mode setting and press Up/Down for the following setting, press the Function button to confirm:
1) Voice
Shutter: On / Off (If choose "off", shutter has no voice while shooting)
Power on sound: choose 1/2/3
Key pressing sound: On/Off (the key has no sound while choosing Off)
Volume: vloume selection 0/3/6/9
2) Power frequency: 50Hz/60Hz
3) Auto-power off: off/ 1min/2mins/3mins (if choose off, the system will not switch off automatically)
4) Screen saver settings: Off/30S/1min/2mins(the system don’t fulfill the operation when choosing “Off”)
5) Image flipped: On / Off (When choosing "On", the image will display with 180-degree)
6) Time & date: set the display mode of recording date and time by Up/Down (year / month / day, day / month / year, month / day / year
7) Language: English/Simplified Chinese/Traditional Chinese/Spanish/French/
Portuguese/German/Japanese/Korean/Russian/Italian
8) TV output: NTSC/PAL
9) USB: portable disk: to read data by USB connection; webcam: to be used as PC Camera by USB connection.
10) Power on screen: Off/ System/Customize
11) Format: Yes/No (when choosing” Yes", the system will format memory card);
12) Restore Factory Settings: Yes / No (When choosing "Yes", the system will restore the factory value);
Press the Menu to exit setup after finished.
l Taking photos mode:
Turn on the DVR, and put the Mode switch button up to the bottom under the standby mode, press Menu to enter into the photos setting and press Up/Down for the following setting:
1) Photo size: 3264*2448,2592*1944,2048*1536,1280*1024
2) Photo quality: best/better/good
3) Shooting mode: Off/Automatically shoot per 2s/ automatically shoot per 10s/ continuously shoot.
4) Exposure: EV-1.0/ EV-0.7/ EV-0.3/ EV+0.0/ EV+0.3/ EV+0.7/ EV+1.0;
5) Date stamp: Off/ date/date & time(if choose “Off”, there is not date and time on pictures )
Press Menu to exit again after finished.
l Playback mode:
Turn on the DVR, under the recording or shooting standby mode, press Menu to enter into the Menu setting, select by Up/Down for the following setting:
1) File locked: lock/unlock sheet, lock/ unlock all
2) File deleted: single deleted, all deleted
3) Slideshow: start, 2S interval, circulation: No
4) Special effects: black & white, negative film, red, green, blue, sunset, warm color, cold color, contrast
5) Rotate: rotate, save, return
6) Voice memo: add, delete (the background voice while setting image)
7) Set the “Power on” picture: Yes/No
8) Press Menu to exit again after finished
u Switch On
Under power off mode,press the Power on/off button, the red light keeps on, the device enters into standby mode.
u Recording
Under the standby state, press the switch button to mode mode, there is a video icon, press the function button, it starts recording. Press the function button again, the video file will be saved and come back to the standby state. If you need continue recording, just repeat the above operation.
Attention:
1. One video file will be according to the set time.
2. Press up / down button to zoom video.
u Taking photos
Under standby mode, press the switch button to photo mode. Press the function button once, the screen flashes once,and one photo has been taken and saved; The device goes back to the standby state. If you want to take more pictures, just repeat the above operation.
Attention: on mode of photo view, press up/down to zoom in/out.
u Recording audio alone
Under standby mode, press the switch button to audio alone mode. Press the function button once, it starts recording audio alone, press the function button again, the device goes back to the standby state. If you want to take more pictures, just repeat the above operation.
Attention: while recording, press up button to stop or continue it.
u Vehicle traveling data recording
Connected the device to your Car via the car charger, the device will record automatically when the car stars.
Stop connecting the car charger, the system saves the last file.
Attention:
1) When the car charger connecting is stopped, the syestem cannot switch off automatically, to save power, press function button to save files then press power off to switch off.
2) When connecting with car charger, the device will switch on automatically, the setting function works normally.
u Webcam
This item can be used as PC CAM, the original software SPCA1528_V2250.ex must be installed before using it.
Under the power off state, use USB cable to connect computer, the menu appears, press up/down to choose PC-CAM, press the function button to confirm, click AMCAP icon, you will see standard video equipment will appear on the computer, click this equipment and it can be as PC CAM.
u Browsing and Playback
Turn on the device, under the viewfinder standby mode, press player button , the system enters into the file browse mode. At this moment, you can use up/down button to select the file browser. Press the function button to play, stop or continue.
u Delete
When view files, press menu button, press up/down to file deleted, press the function button, choose single delete or all delete, press the fucntion button to confirm.
u AV out
Under power off mode, connect the device with TV via AV out cable, press power on off button, the AV out function works.
u Turn off
Under any mode, long press power off can turn the device off.
u Charging
1) charging with computer with USB cable
2) Charging with power charger, when connected, press function button to stop recording, keep it at charging.
3) Charging with car charger
u Video play
Under any mode, use USB to connect computer, the menu appears, press up/down button to choose MSDC, press function button to confirm, it enters into movable disk mode, click the files to playback.
u Working whilst charging
Under any mode, use USB to connect computer, the menu appears, press up/down button to choose VIDEO, press function button, it enters into video standby mode, press the other button for normal operation.
Under any mode, connect the device with power charger or car charger, the device will power on automatically and record, press the function button to stop recording.
Attention:
1) The system will save files as set cycling recording time.
2) When removing the power with stopping video recording, the system will save the last file, and crate a new file to continue recording.
l Attentions
1. This device has6 IR lights, they can detect the light automatically to achieve a good night vision result.
2. When mode switching, press function button to save recorded files first then enter into other mode, otherwise the recorded files may be lost.
3. Connect to computer: the time for computer with different system or configuration to identify the hardware is slightly different. During this period, please wait for a moment. If computer can’t identify, please make sure your operating system, drivers and USB interface cable in good work order, then connect again.
4. Under a bright environment, keep the device and 50-centimeter distance from the scene you want to record in order to achieve a best effect. This device hasn’t any anti-trembling function, so please hold the device stable.
5. As the device has built-in high-capacity polymer lithium battery, so it has a memory effect. We advise in the first 5 times of usage, charge the battery fully after the battery is out of use, so that the battery can work with its max working hours perfectly.
- Previous: User Manual of Bluetooth MP3 Cap Camera
- Next: User Manual of Car DVR Camera
