
Download
Contact Us
 Telephone:+860755-89505873
Fax:+860755-89504913
After-sales department:
+860755-89505873-8030 Ms Leung

- 413958458

- 13926598885
Users Manual
User Manual of Smiley Face Camera
Source:未知
Writer:admin
Time:2012-10-10 11:22:35
Click:Loading...
User Manual of Smiley Face Camera
l Product Accessories
● USB Video Camera ● AV out/USB cable ● A user manual CD ● A set of bracket & clip
l Picture & Buttons
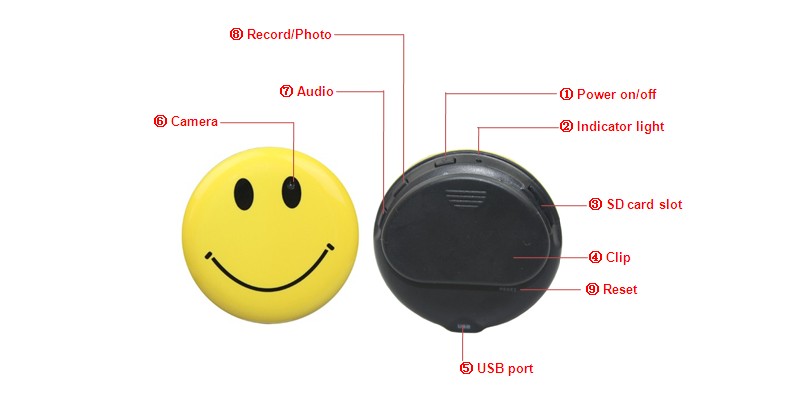
View Description:
1. Power on/off 2. Indicator light 3. SD card slot
4. Clip 5. USB port 6. Camera 7. Audio 8. Record/Photo
l Technical Data
1) Functions: recording video & audio, taking photo, recording audio alone, web camera, TV out, USB drive
2) Video: AVI, 720*480 resolution
3) Photo: JPEG, 2048*1536 resolution
4) Audio: WAV format
5) Video output: NTSC/PAL
6) Memory: SD card 2GB-8GB
7) USB: 2.0(Hs)
8) Charging time: 2 - 3 hours
9) Battery use time: built-in Li battery, 1 hour
10) Operation systems: No need for driver installation if the operating system is Windows ME/2000/XP/Vista or above(Windows98 is excepted)
l Operation
To start the device, insert a Micro-SD or TF card into SD card slot
u Switch On
Under power off mode, long press the power on button for 3 seconds, the yellow light flashes 3 times then keeps on, the device enters into standby mode.
Attention: the device will power off automatically when there is no operation within 1minute.
u Taking Photo
Under standby mode, short press the video/photo button once, yellow light flashes once. A photo is taken, the camera backs to standby mode.
u Recording video & audio
Under standby mode, long press the video/photo button, the yellow light turns off, it starts recording. Long press the button again, yellow light turns on, it saves the video files and backs to standby mode.
Attention:
When the device is recording, yellow light flashes every 15 seconds.
u Recording audio alone
Under standby mode, short press the audio button once, blue light flashes once, it starts recording audio. Short press the audio button once again, yellow light turns on, the camera backs to standby mode.
Attention:
1) When the device is recording audio, yellow light flashes every 15 seconds.
2) Press audio button to check the working status.
u Reset
If the device cannot work normally due to incorrect operation or other reason, press the power on button and video/photo at the same, it will reset, the device is under power off mode.
Attention: if resetting while it is working, the files will not be saved.
u Switch off
Under standby mode, long press the power on/off button, all lights turn off. The files will be saved automatically before power off.
u Charging
Charging with PC via USB cable, the blue light of the camera keeps on. When fully charged, the blue light turns off.
When it is of low power, the yellow light keeps flashing quickly then save the current files before power off.
u TV out
Adjust TV to AV mode, choose NTSC or PAL TV system
Connect the device with TV via USB cable.
Long press the power on button for 3 seconds, the device enters into TV out mode.
Short press Audio button or Video/Photo button to choose the files.
Short press Power on button to play.
Attention: when playing, long press Video/Photo button to fast forward; long press Audio button to fast backward; short press power on button to Pause or play.
u Playback on computer
Connect the camera with computer under power off mode. Then playback the video file, please make sure that you have install the relevant software before connect with the computer.
Attention:
To make sure it plays more smooth, we suggest you to copy the files to your company disk.
u Web Camera
Install a webcam software named SPCA1528_V2250.exe.
Under power off or standby mode, connect the camera with the computer via USB cable, short press Audio button, the web camera icon will show in computer, then the web camera works.
u Setting Time
When playing the video file, the device will show the recording time & date.
Please set time as follows:
1) Connect the device with PC via USB cable, there will be a moveable disk shown on PC.
2) Short press the Audio button
3) Click “SyncTime.exe” program in the CD, a dialog box named “SyncTime Tool” shows, click “synchronization” button, after it, the set time & date will be synchronous as that of PC.
4) Attention: it can only be set time & date after the above webcam driver is installed.
l Attention
1) Please check if the device has enough power and charge it when it cannot power on.
2) If the memory capacity is not enough, the device saves the current files first then power off automatically.
3) Connected to the computer: computer configuration or system according to differences in recognition time will be slightly different hardware, if you can not recognize, make sure your operating system, driver, USB interface cable are all normal, and then re-connect.
4) Under adequate light environment, you can get the best video and images within a certain distance.
5) As the device has built-in high-capacity polymer lithium battery, so it has no memory effect. We advise in the first 5 times of usage, charge the battery fully after the battery is out of use, so that the battery can work with its max working hours perfectly.
- Previous: User Manual of USB Video Camera
- Next: HD Mini DV camera
