
Download
Contact Us
 Telephone:+860755-89505873
Fax:+860755-89504913
After-sales department:
+860755-89505873-8030 Ms Leung

- 413958458

- 13926598885
Users Manual
HD 1080P Waterproof DV Camera JVE-HD08
Source:未知
Writer:admin
Time:2014-07-02 14:01:08
Click:Loading...
HD 1080P Waterproof DV Camera JVE-HD08
1、Accessories:
●Camera ●USB Cable ●User Manual ●Suction Cup Mount
●Helmet Mount ●Handlebar Seat post Mount ●Waterproof Case
●Helmet Belt
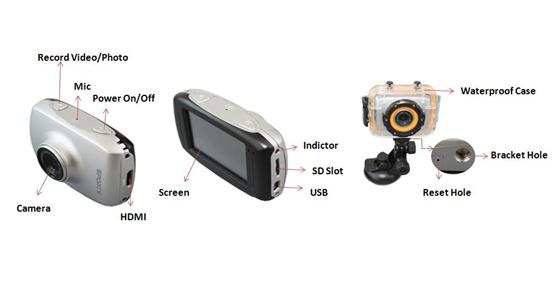
2、Appearance & Buttons:
3、Specifications:
With Elegant Appearance, easy to operate. Support waterproof underwater 5M.
Please attention: Please Install the waterproof case well before to make video under water.
Application: Party, car recording, Under Water Recording, Bicycle Activity, Skiing, Climbing and so on.
● Main Function: Record Video & Audio Simultaneously, Take Photo, Playback, Webcam, USB Drive, HDMI Port
● Video Format: AVI, 1920*1080 ,1280*720,640*480 (Optional)
● Photo Format: JPEG, 4000*3000 ,3264*2448,2592*1944 ,2048*1536 (Optional)
● Audio Format: WAV
●Memory: Internal Above 512MB ;External Max 32GB
● USB: 2.0(Hs)
●Charging: 3- 4 hours
● Working Time:3-3.5 Hours
● Operation System: Microsoft Windows 2000, XP, Vista, 7
4、Operation:
Notes: This DV has not Built-in memory card. Please insert a memory card before use..
u Power on
Under Power off mode: press power button for one second, then the screen starts to display and the DV enters to standby mode.
u Recoding
Under standby mode, short press recording button, Blue LED Light flashes fast enter into
recording mode, short press the recording button again to save video, then back to standby mode. As the follow picture:
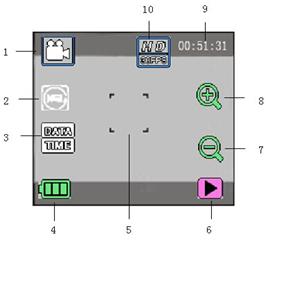
1Video icon: indicates that it is currently in video mode.
2:Cycle length: indicates length of time of each
3:Time setting: Set camera system time and press SET to
return and confirm after setting
4:Battery Power: indicates current power of battery
5:Virtual shutter: clink this icon to take photos or videos
6:Playback icon : Clink to switch back to playback mode
7:Zoom icon: clink to zoom out
8:Zoom icon: clink to zoom in
9: 00:51:31: timer, which indicates that it can record for another 51 min and 31 sec.
10:Video size: clink to choose from 1080P/720P/VGA
Notes: The DV will screen off automatically to save power during recording, user can short press recording button to restore display.
u Take Photo
Under standby mode, touch the icon on upper left corner of LCD into camera mode. Short
Press photo button to take one photo, will be save auto, then back to standby mode.
1Camera mode: indicates that it is currently in camera mode
2:Time setting: Set camera system time and press SET to
return and confirm after setting
3:Battery Power: indicates current power of battery
4:Virtual shutter: clink this icon to take photos or videos
5: :Playback icon : Clink to switch back to playback mode
6:Zoom icon: clink to zoom out
7:Zoom icon: clink to zoom in
8:Counter: indicates the number of photos that can be taken
9:Photo pixel: clink this icon to choose from 3M/5M/8M/12M mode
10:Timing&continuous shooting : select time of timing shooting and continuous shooting mode.
u Playback mode
Power on enter into playback mode, clink playback icon( ) at the lower right corner of LCD.
1: Clink this icon to return to video mode upon completion of play
2: Clink to select files backward
3:Clink to activate screen of confirming to delete current image
4:Clink to play current film clips
5:Battery
6:Clink to select files forward
7:Order of file in current folder
8:Total Length of time of current file
9:indicates : current file is 1080P
u Play film clips:

When playing, click to pause, and click
 to stop.
u Delete File:
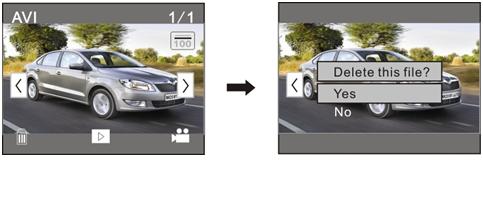
Click select “Delete Current Image” to delete current file, and select
“Delete All Image?” to delete all files, and select “Cancel” to cancel delete
operation.
u Webcam
Under standby mode, enter into camera mode, long press photo button while connect DV
camera with computer, computer screen will appear “PC Camera” ,that indicates that have entered into webcam function.
u Reset
If the device is not functioning properly, for example, the unit crashed or can’t record video, Please reset device by clip, please insert the clip into the reset hole lightly.
Reset device when recording, video won’t be saved.
u Power off
●Press power off button for one second
●If there is no any operation within 3 minutes under standby mode, device will power off auto
u Playback:
Connect to computer by USB Cable , clink removable disk, double clink file to playback video.
Notes: It is unnecessary to install driver by using the function of mobile hard disk on windows 2000 or high windows operating system.
u Charging
l Under power off or standby mode, connect to computer by USB Cable to charging, Red indicator turn on, will turn off automatically after full charged.
1) Built in Polymer Lithium battery, please charge the battery fully after you have used out the battery first five times. By doing so, you can access the maximum capacity of the battery, reaching the standard working hours.
l 5、Attention:
1、If there is no any operation within 3 minutes under standby mode, device will power off auto. 4、Do not place DV under direct sunlight, or point lens to sun. Otherwise, image sensor maybe damaged.
2、During recording, if the power is not enough, system will keep the video first, then
Power off automatically.
1、If there is no any operation within 3 minutes under standby mode, device will power off auto.
2、During recording, if the power is not enough, system will keep the video first, then
Power off automatically.
3、When taking video continually, the system will automatically generate a new video file after each operation.
4、In the adequate light environment, keep the DV vertical and stable, you can get best video and images within a certain distance.
5、Connection to PC: The time of PC recognizing the device is different according to its different system and configuration, so please not operate during recognizing. If the device can’t be recognized, please check your computer’s operation system, device drivers, USB port and the USB cable is normal, and then connect the hardware again.
6、Please press it slightly when reset the device, otherwise the components will be damaged
7、Do not place DV under direct sunlight, or point lens to sun. Otherwise, image sensor maybe damaged.
8、Keep DV away from dust and chemical materials, and place in cool, dry and well-ventilated places. Do not place DV in high-temperature, humid or dusty places to prevent failure of DV.
9、Do not touch surface of lens with fingers.
10、Power off when power is low: when the power is very low, LCD screen will show icon “ ”, please charging DV in time. When the icon become red color and flashes, DV camera will power off automatically.
1、Accessories:
●Camera ●USB Cable ●User Manual ●Suction Cup Mount
●Helmet Mount ●Handlebar Seat post Mount ●Waterproof Case
●Helmet Belt
2、Appearance & Buttons:
3、Specifications:
With Elegant Appearance, easy to operate. Support waterproof underwater 5M.
Please attention: Please Install the waterproof case well before to make video under water.
Application: Party, car recording, Under Water Recording, Bicycle Activity, Skiing, Climbing and so on.
● Main Function: Record Video & Audio Simultaneously, Take Photo, Playback, Webcam, USB Drive, HDMI Port
● Video Format: AVI, 1920*1080 ,1280*720,640*480 (Optional)
● Photo Format: JPEG, 4000*3000 ,3264*2448,2592*1944 ,2048*1536 (Optional)
● Audio Format: WAV
●Memory: Internal Above 512MB ;External Max 32GB
● USB: 2.0(Hs)
●Charging: 3- 4 hours
● Working Time:3-3.5 Hours
● Operation System: Microsoft Windows 2000, XP, Vista, 7
4、Operation:
Notes: This DV has not Built-in memory card. Please insert a memory card before use..
u Power on
Under Power off mode: press power button for one second, then the screen starts to display and the DV enters to standby mode.
u Recoding
Under standby mode, short press recording button, Blue LED Light flashes fast enter into
recording mode, short press the recording button again to save video, then back to standby mode. As the follow picture:
1Video icon: indicates that it is currently in video mode.
2:Cycle length: indicates length of time of each
3:Time setting: Set camera system time and press SET to
return and confirm after setting
4:Battery Power: indicates current power of battery
5:Virtual shutter: clink this icon to take photos or videos
6:Playback icon : Clink to switch back to playback mode
7:Zoom icon: clink to zoom out
8:Zoom icon: clink to zoom in
9: 00:51:31: timer, which indicates that it can record for another 51 min and 31 sec.
10:Video size: clink to choose from 1080P/720P/VGA
Notes: The DV will screen off automatically to save power during recording, user can short press recording button to restore display.
u Take Photo
Under standby mode, touch the icon on upper left corner of LCD into camera mode. Short
Press photo button to take one photo, will be save auto, then back to standby mode.
1Camera mode: indicates that it is currently in camera mode
2:Time setting: Set camera system time and press SET to
return and confirm after setting
3:Battery Power: indicates current power of battery
4:Virtual shutter: clink this icon to take photos or videos
5: :Playback icon : Clink to switch back to playback mode
6:Zoom icon: clink to zoom out
7:Zoom icon: clink to zoom in
8:Counter: indicates the number of photos that can be taken
9:Photo pixel: clink this icon to choose from 3M/5M/8M/12M mode
10:Timing&continuous shooting : select time of timing shooting and continuous shooting mode.
u Playback mode
Power on enter into playback mode, clink playback icon(
1: Clink this icon to return to video mode upon completion of play
2: Clink to select files backward
3:Clink to activate screen of confirming to delete current image
4:Clink to play current film clips
5:Battery
6:Clink to select files forward
7:Order of file in current folder
8:Total Length of time of current file
9:indicates : current file is 1080P
u Play film clips:
When playing, click
u Delete File:
Click
“Delete All Image?” to delete all files, and select “Cancel” to cancel delete
operation.
u Webcam
Under standby mode, enter into camera mode, long press photo button while connect DV
camera with computer, computer screen will appear “PC Camera” ,that indicates that have entered into webcam function.
u Reset
If the device is not functioning properly, for example, the unit crashed or can’t record video, Please reset device by clip, please insert the clip into the reset hole lightly.
Reset device when recording, video won’t be saved.
u Power off
●Press power off button for one second
●If there is no any operation within 3 minutes under standby mode, device will power off auto
u Playback:
Connect to computer by USB Cable , clink removable disk, double clink file to playback video.
Notes: It is unnecessary to install driver by using the function of mobile hard disk on windows 2000 or high windows operating system.
u Charging
l Under power off or standby mode, connect to computer by USB Cable to charging, Red indicator turn on, will turn off automatically after full charged.
1) Built in Polymer Lithium battery, please charge the battery fully after you have used out the battery first five times. By doing so, you can access the maximum capacity of the battery, reaching the standard working hours.
l 5、Attention:
1、If there is no any operation within 3 minutes under standby mode, device will power off auto. 4、Do not place DV under direct sunlight, or point lens to sun. Otherwise, image sensor maybe damaged.
2、During recording, if the power is not enough, system will keep the video first, then
Power off automatically.
1、If there is no any operation within 3 minutes under standby mode, device will power off auto.
2、During recording, if the power is not enough, system will keep the video first, then
Power off automatically.
3、When taking video continually, the system will automatically generate a new video file after each operation.
4、In the adequate light environment, keep the DV vertical and stable, you can get best video and images within a certain distance.
5、Connection to PC: The time of PC recognizing the device is different according to its different system and configuration, so please not operate during recognizing. If the device can’t be recognized, please check your computer’s operation system, device drivers, USB port and the USB cable is normal, and then connect the hardware again.
6、Please press it slightly when reset the device, otherwise the components will be damaged
7、Do not place DV under direct sunlight, or point lens to sun. Otherwise, image sensor maybe damaged.
8、Keep DV away from dust and chemical materials, and place in cool, dry and well-ventilated places. Do not place DV in high-temperature, humid or dusty places to prevent failure of DV.
9、Do not touch surface of lens with fingers.
10、Power off when power is low: when the power is very low, LCD screen will show icon “
