
Download
Contact Us
 Telephone:+860755-89505873
Fax:+860755-89504913
After-sales department:
+860755-89505873-8030 Ms Leung

- 413958458

- 13926598885
Users Manual
User Manual of Telescope Camera JVE-HD07
Source:未知
Writer:admin
Time:2014-07-02 13:44:20
Click:Loading...
1、Product Accessories:
●1 camera ● 1 USB Cable ●1 Lens cloth
● 1 User Manual
2、Picture & Button:
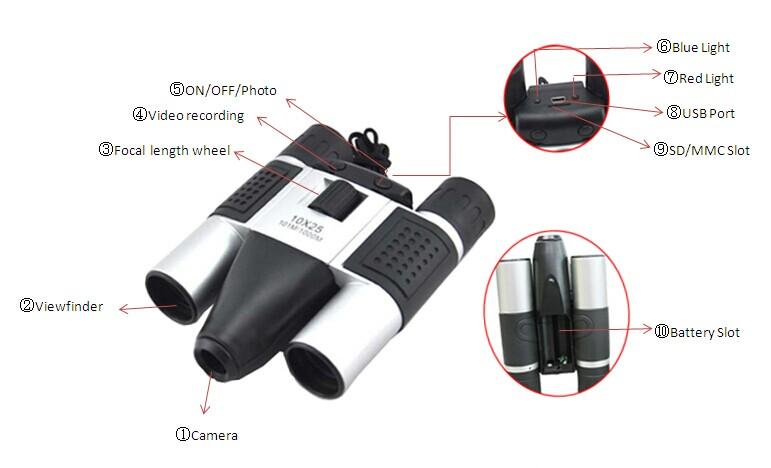
Diagrams illustration:
1、Camera 2.Viewfinder 3.Focal length wheel 4. Video recording
5、ON/OFF/Photo 6.Blue Light 7.Red Light
8、USB Port 9.SD/MMC Slot 10.Battery Slot
3、Product Data:
● Main Function:Recording Video &Audio simultaneously、take photos、Web Camera、USB disk
● Product Features:Used as a telecophone
● Video Format:AVI, 640*480
● Photo Format:JPEG, 1280*960
● External Memory:2GB 、Maximum support up to 32GB
● USB: 2.0(Hs)
● Battery:AA Battery
● Operation Systems:No need for driver installation if the operating system is Windows 98/ 2000/ XP/ WISTA or above
4、Operation:
Please insert an external Micro SD or TF card before using, and open the battery cover insert two AA batteries.
1Turn on:
In shutdown state, long pressing the ON/OFF/Photo key , until the blue and red light start to flash alternately, then it enters standby mode automatically
② Video recording:
In standby mode ,shortly press Video recording button, then red light will be off and the blue light flashes. Then it enters recording status automatically .Shortly press video recording key, the files will be automatically saved. Then the blue and red light start to flash alternately , returned to the standby mode.
③ Taking a photo:
In standby mode,shortly press ON/OFF/Photo key, the blue and red light flash once at the same time, it photographed one and return to standby mode
④ Turn off:
1)In standby mode, long press ON/OFF/Photo key, meanwhile the blue and red light will flash five times, it enters the shutdown status
2)If there is no operation within 5mintues when it was in standby mode, it will automatically shot down。
⑤ Reset:
When the product is illegally operated or affected by other unknown factors, you need to reset it. Please open the battery cover then pull out the battery to complete the reset. At this time this machine is turned off.
⑥Charging:
In shutdown or standby mode, connect it to a computer USB plot via the USB cable. The red light keep on and the blue light flashes.
⑦File Playback:
After taking recording or taking photos, connect it to the computer via the USB cable, click on the removable disk, double-click on the selected video files to play on your computer. Make sure you have installed the computer connected to the relevant player software; Photo Double-click to view.
8Web camera
Connect the machine to the computer via USB cable, shortly press the ON/OFF/Photo , blue light and red light will keep on at this time, there will be a standard video devices on the computer, and the device can be used when the camera used.
5、Attention:
1.Under recording, if it has low power the system will save the video content and then automatically shut down.
2. If you keep continuous record, each time after the operation, the system will automatically generate a new video file
3. There is a adequate lighting in the environment, maintaining DV vertical stabilizer, and the scene being shot kept within a certain distance, it will get the best results for images.
4.Connected to the computer: it will be slight different to identify the hardware according to the computer system configuration or difference.Please do not perform any operation during this period, so as not to affect the hardware identification. If you can not identify, verify your operating system, drivers, USB interface cable are normal, then reconnect.
5.Don’t discard the used battery together with ordinary household garbage, it should be sent to an official collection point for batteries, or being sent to a designated collection point
●1 camera ● 1 USB Cable ●1 Lens cloth
● 1 User Manual
2、Picture & Button:
Diagrams illustration:
1、Camera 2.Viewfinder 3.Focal length wheel 4. Video recording
5、ON/OFF/Photo 6.Blue Light 7.Red Light
8、USB Port 9.SD/MMC Slot 10.Battery Slot
3、Product Data:
● Main Function:Recording Video &Audio simultaneously、take photos、Web Camera、USB disk
● Product Features:Used as a telecophone
● Video Format:AVI, 640*480
● Photo Format:JPEG, 1280*960
● External Memory:2GB 、Maximum support up to 32GB
● USB: 2.0(Hs)
● Battery:AA Battery
● Operation Systems:No need for driver installation if the operating system is Windows 98/ 2000/ XP/ WISTA or above
4、Operation:
Please insert an external Micro SD or TF card before using, and open the battery cover insert two AA batteries.
1Turn on:
In shutdown state, long pressing the ON/OFF/Photo key , until the blue and red light start to flash alternately, then it enters standby mode automatically
② Video recording:
In standby mode ,shortly press Video recording button, then red light will be off and the blue light flashes. Then it enters recording status automatically .Shortly press video recording key, the files will be automatically saved. Then the blue and red light start to flash alternately , returned to the standby mode.
③ Taking a photo:
In standby mode,shortly press ON/OFF/Photo key, the blue and red light flash once at the same time, it photographed one and return to standby mode
④ Turn off:
1)In standby mode, long press ON/OFF/Photo key, meanwhile the blue and red light will flash five times, it enters the shutdown status
2)If there is no operation within 5mintues when it was in standby mode, it will automatically shot down。
⑤ Reset:
When the product is illegally operated or affected by other unknown factors, you need to reset it. Please open the battery cover then pull out the battery to complete the reset. At this time this machine is turned off.
⑥Charging:
In shutdown or standby mode, connect it to a computer USB plot via the USB cable. The red light keep on and the blue light flashes.
⑦File Playback:
After taking recording or taking photos, connect it to the computer via the USB cable, click on the removable disk, double-click on the selected video files to play on your computer. Make sure you have installed the computer connected to the relevant player software; Photo Double-click to view.
8Web camera
Connect the machine to the computer via USB cable, shortly press the ON/OFF/Photo , blue light and red light will keep on at this time, there will be a standard video devices on the computer, and the device can be used when the camera used.
5、Attention:
1.Under recording, if it has low power the system will save the video content and then automatically shut down.
2. If you keep continuous record, each time after the operation, the system will automatically generate a new video file
3. There is a adequate lighting in the environment, maintaining DV vertical stabilizer, and the scene being shot kept within a certain distance, it will get the best results for images.
4.Connected to the computer: it will be slight different to identify the hardware according to the computer system configuration or difference.Please do not perform any operation during this period, so as not to affect the hardware identification. If you can not identify, verify your operating system, drivers, USB interface cable are normal, then reconnect.
5.Don’t discard the used battery together with ordinary household garbage, it should be sent to an official collection point for batteries, or being sent to a designated collection point
- Previous: Diving mask camera JVE-HD06
- Next: HD 1080P Waterproof DV Camera JVE-HD08
