
Download
Contact Us
 Telephone:+860755-89505873
Fax:+860755-89504913
After-sales department:
+860755-89505873-8030 Ms Leung

- 413958458

- 13926598885
Users Manual
User Manual of All-in-one Video Glasses
Source:未知
Writer:admin
Time:2012-10-09 18:17:42
Click:Loading...
User Manual of All-in-one Video Glasses
1、Product Accessories:
● Glasses ● USB Cable ● data cable for charging
● User Manual CD ● Glasses Wrap ● Charger
2、Picture & Buttons:
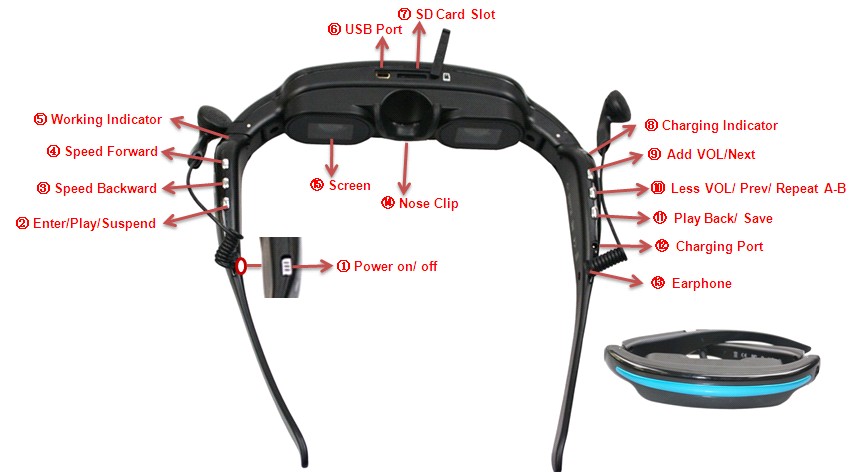
1、Power on/ off 2、Enter/Play/Suspend 3、Speed Backward 4、Speed Forward 5 Working Indicator 6、USB Cable 7、SD Card Slot 8、Charging Indicator 9、Add VOL/Next 10、Less VOL/ Previous/ Repeat A-B 11、Play Back/ Save 12、Charging Port 13、Earphone 14、Nose Clip 15、Screen
3、Technical Data
52 inches virtual screen, enjoy the powerful audio-visual effects any time anywhere. This device is a machine with save/play/view function, provide perfect effects in audio& video display system and storage, triple problems will be solved if one piece in hand, get rid of external equipments, make a real convenient & unrestrained mobile theatre come true.
● Main Function: video display, photos browse, MP3 & MP4, E-book, Explorer, Operating while charging, USB drive,
● Audio Format: MP3、WMA、FLAC、AAC、APE
● Picture Format: JPEG、BMP、GIF
● Internal Storage: 2GB internal memory, support TF card extend, Max 32GB
● Sound: Normal, Rock, Popular, Classic, User-defined, Mega bass, Jazz, Play-FX
● USB:2.0(Hs)
● Charging time: 3-4 hours
● Recording time: 2-3 hour, Built-in Li Battery
● Operating System: No need for driver installation if the operating system is Windows ME/ 2000/ XP/ VISTA or above (Excepted Windows 98)
4、Operation:
◆ Power on
Under the power off mode, push the Power On/Off button to the side “On”, the blue indicator keeps on, indicating the system turns on, the device will turn to the main interface of Function Selection.
Attention:
1)、When the first time using the new device, two video files will combine as a video file, 2-3 minutes are needed during the opening process.
2)、Under the interface function mode, the device will power off automatically if no operation within 30 seconds; Press the Enter/Play/Suspend button to restart the device.
◆ Function Settings
After turns on the device regularly, press the Next/Speed Forward, PRVE/Speed Backward button or the Add VOL/Next, Less VOL/ Previous/ Repeat A-B button, select “setting” and shortly press the Enter/Play/Suspend button, the device will turns to the setting surface, And then, press Next/Speed Forward, PRVE/Speed Backward button, select the “setting” file and press Enter/Play/Suspend button to save it.
1、Display setting:
In the Settings Menu, select the “display setting”, press Enter/Play/Suspend button turns the device to the subdirectory of “backlight display” and “hidden status line”, press the Next/Speed Forward, PRVE/Speed Backward button or the Add VOL/Next, Less VOL/ Previous/ Repeat A-B button select and setting. (Backlight: 5 seconds/ 10 seconds/ 15 seconds/ 20 seconds/ 30 seconds/ normally on)
2、system setting:
In the Settings Menu, select the “system setting”, press Enter/Play/Suspend button turns the device to the subdirectory of “Firmware Upgrades” and “System Restore”;
1)、Firmware Upgrades: This Menu arise a tips ask about whether to upgrade the firmware, exits if no upgrades.
2)、System Restore: This Menu arise a tips ask about whether to restore the system, exits if not restore.
3、Desktop setting:
In the Settings Menu, select the “desktop setting”, press Enter/Play/Suspend button turns the device to select a lovely desktop of your own interest.
4、Language setting:
In the Settings Menu, select the “desktop setting”, press Enter/Play/Suspend button turns the device to select the right language. The device provide: Simplified Chinese/ English/ German/ Italian/ Portugal/ Dutch/ French/ Spain/ Polish/ Russian/ Danish/ Japanese/ Korean/ Traditional Chinese for your choice.
Attention: After the operations, shortly press the Play Back/Save button to finish the setting. ( If press the Play Back/ Save button over 2 seconds, the device will turns off and save the settings, then turns the Power On/Off button to the “OFF” side; If turns the Power On/Off button to the “OFF” side directly, all the settings will not work.)
◆ Connection & Transmission
Under the Power on mode, connect the computer via the USB cable, activate the Mobile disk function and use it as an USB drive, copy the music, the movies of your own interest to the device, then you could enjoy it at ease.
◆ TF card broadening
The video glasses support Max.32GB TF card, if insert a TF card with videos and pictures and turns it on, there will appear a choice of “Flash” or “SD Card” as access the Explorer of video display, photos browse and E-book reading, select “SD Card”, the contents in the TF card will display in the surface, select the file and you can play directly; It is the contents of the local device if select “Flash”.
◆ A-B Repeating Function
Under the music playing mode, press the Less VOL/ Previous/ Repeat A-B button over 2 seconds, “A” will appear at the bottom of the screen, regarding as the start of the repeating;
Press the Less VOL/ Previous/ Repeat A-B button over 2 seconds again, “A-B” will appear at the bottom of the screen, regarding as the end of the repeating, the device will repeat the file again and again.
If press the Less VOL/ Previous/ Repeat A-B button over 2 seconds at the third time, the device will exit the repeating mode.
◆ Music Display
● Under the mode of function surface, press the Next/Speed Forward, PRVE/Speed Backward button or the Add VOL/Next, Less VOL/ Previous/ Repeat A-B button, select “music display”, then press the Enter/Play/Suspend button access the music media Menu, “all the music, artist, special, genre, Favorite, directory listing, media updates, breakpoint memory, playing recover” are including.
Press the Next/Speed Forward, PRVE/Speed Backward button or the Add VOL/Next, Less VOL/ Previous/ Repeat A-B button to select, and press the Enter/Play/Suspend button access the setting.
● Under the mode of Music media,
Select “all the music”, press the Enter/Play/Suspend button access the directory listing,
Press the Next/Speed Forward, PRVE/Speed Backward button or the Add VOL/Next, Less VOL/ Previous/ Repeat A-B button to select the favorite song, then press the Enter/Play/Suspend button, select “add to favorites” add the songs to the file “my favorites”.
● When playing music,
Shortly press the Add VOL/Next, Less VOL/ Previous/ Repeat A-B button to adjust the sounds;
Shortly press the Next/Speed Forward, PRVE/Speed Backward button to select songs.
● When playing music,
Press the Enter/Play/Suspend button for a few seconds, the setting menus will appear at the screen,
Press the Next/Speed Forward, PRVE/Speed Backward button or the Add VOL/Next, Less VOL/ Previous/ Repeat A-B button to choose the setting items:
1)、Loop setting
Single once: stop after playing the current song;
Single Loop: Loop the current song only;
Loop Once: Loop all songs once;
Loop All: Loop all the songs.
Listening test: Each single song will play 10 seconds (the device will back to the cycle mode after the listening test).
2)、Play setting:sequence / random;
3)、Sound effect:Normal, Rock, Popular, Classic, User-defined, Mega bass, Jazz, Play-FX;
4)、Screen Display:lyrics / frequency spectrum /shut down。
After the operations, shortly press the Play back/Save button to complete and save the settings.
Attention: APE songs supports only 3.95, 3.97, 3.98 NORMA and FAST compress edition.
◆Video Displaying:
● Under the mode of function surface,
Press the Next/Speed Forward, PRVE/Speed Backward button or the Add VOL/Next, Less VOL/ Previous/ Repeat A-B button, select “video display”,
Then press the Enter/Play/Suspend button access the movies media resources, choose the movie or video file and press the Enter/Play/Suspend button again to play.
● When playing videos,
Shortly press the Next/Speed Forward, PRVE/Speed Backward button will turn the device to the next video file or the previous file playing.
Press the Next/Speed Forward, PRVE/Speed Backward button for a few seconds is to playing speed forward or speed backward.
Shortly press the Enter/Play/Suspend button is to suspend the playing; shortly press the Play Back/Save button will back to the previous menu page.
Attention: Support video files under RM/RMVB: 720*576; AVI: 800*480; the large file needs longer time in loading, files need to be transformed if out of the range.
◆ photos browse:
● Under the status of function surface,
Press the Next/Speed Forward, PRVE/Speed Backward button or the Add VOL/Next, Less VOL/ Previous/ Repeat A-B button, choose the “photos browse”,
Press the Enter/Play/Suspend button access the photo files resources, select the photo file, press the Enter/Play/Suspend button to skim through.
● When skim through the photo files,
Shortly press the Enter/Play/Suspend button, menus for choose will appear at the screen: rotate right, rotate left, bigger, smaller, skim through; choose the items according to your own habits, then press the Enter/Play/Suspend button to skim through.
Shortly press the Play Back/Save button will back to the previous menu page.
◆E-book Reading:
●Under the status of function surface,
Press the Next/Speed Forward, PRVE/Speed Backward button or the Add VOL/Next, Less VOL/ Previous/ Repeat A-B button, choose the “E-book”,
Press the Enter/Play/Suspend button access the E-book files resources, select the TXT file of your interest, and press the Enter/Play/Suspend button to read.
● When reading the E-book,
Shortly press the Next/Speed Forward, PRVE/Speed Backward button to forward or backward in reading;
Shortly press the Add VOL/Next, Less VOL/ Previous/ Repeat A-B button to push the reading forward to the next page or backward to the previous page.
Shortly press the Play Back/Save button will back to the previous menu page.
Attention:The device supports only “ANST” encoded text TXT, other encoded text could save as “ANST” via the note-book in the computer, save the file as (*.txt) in your computer, then copy it to the device to read.
◆Explorer:
All the files and catalogue are display in the Explorer clearly, which is convenient for users to look for.
Under the status of function surface,
Press the Next/Speed Forward, PRVE/Speed Backward button or the Add VOL/Next, Less VOL/ Previous/ Repeat A-B button, select “Explorer”
Click the Enter/Play/Suspend button, access the files resources explorer, choose the target file and press the Enter/Play/Suspend button to skim through.
◆ Files Playing in computer:
Under the power on mode, connect the computer via the USB cable, access the Removable disk, click the video or movie files twice to play in the computer. Make sure the player has been installed already before connect to the computer.
◆ Operating while charging:
●Under the power on/off mode, connect the video glasses to the computer via the data cables for charging, then the device can be operate normally when charging.
●Under the power on mode, connect the video glasses to the computer via the USB cable, click to exit the removable disk, then the device can be operate normally when charging.
Attention:While connect the video glasses to the computer via the USB cable, only when exit the removable disk, the device can work normally while charging.
◆Power off:
Under the status of function surface, press the Play Back/ Save button for a few seconds, the screen will be shut down, you need to turns the Power on/off button to the “OFF” side, all the indicator dies out, indicating the device power off already.
◆Charging:
●Under the power off mode, connect the camera to computer via USB cable or the data cables for charging to charge the device, red indicator keeps on while charging, also, red indicator will dies out after the device is full.
Attention: Both the DCIN and USB port can be connect to the charger or computers to charge, but in order not to damage the device, connect both is prohibit
5、Attentions:
1、 The video glasses cannot play videos under the removable disk mode, otherwise will damage the device and the screen will keep flash.
2、 Before use the new device, please charge for 4-5 hours to attain the better use effect.
3、 Connected to the computer: the time for computer with different system or configuration to identify the hardware is slightly different. Please wait for a moment without any operations during this period. If computer can’t identify, please make sure your operating system, drivers and USB interface cable are in good work condition, and connect again.
4、 As the device is built-in Li Battery without memory effect. So we advise in the first 5 times of usage, charge the battery fully after the battery is out of use, so that the battery can work with its max working hours perfectly.
