
Download
Contact Us
 Telephone:+860755-89505873
Fax:+860755-89504913
After-sales department:
+860755-89505873-8030 Ms Leung

- 413958458

- 13926598885
Users Manual
User Manual of Multi-functional Thumb Camera
Source:未知
Writer:admin
Time:2012-10-10 09:57:27
Click:Loading...
User Manual of Multi-functional Thumb Camera
l Product Accessories
● Thumb camera ● USB cable ● User manual CD
● Back clip and Bracket ● A clip
l Appearance and Buttons
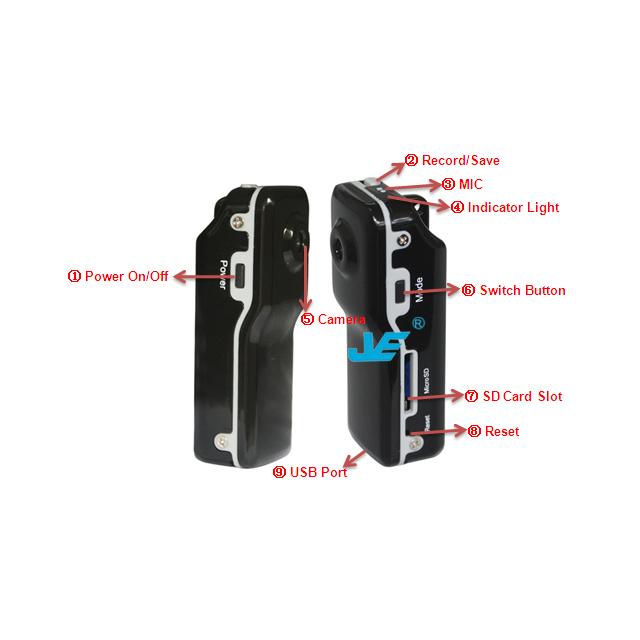
1. Power on/off 2. Record /Save 3. Mic 4. Indicator Light 5. Camera 6. Switch Button 7. SD card Slot 8. Reset 9. USB Port
l Technical Data
1) Main Functions: video and audio at the same time; Voice control recording audio & video; USB drive; Web Cam;
2) Tiny dimension, fashion and wear various usage
3) Support webcam function, can be used for chatting online
4) Video Format: AVI,720*480
5) Support Micro SD card/T-Flash card 1GB-8GB
6) USB port: 2.0 (Hs)
7) Charging time : 2-3 hours
8) Battery: built-in Lithium-ion battery, can be used for about 2 hours
9) Recommended players: Kmplayer、Mplayer and other media players that support various formats
10) No need for driver installation if the operating system is Windows ME/ 2000/ XP/ VISTA or above (windows98 is excepted)
l Operation
u Switch on
1) Before switch on it, please insert Micro SD card by pushing it firmly into the slot until it clicks into place. If without Micro SD card, when the camera is on, the red light will keep on and the blue light will be twinkling, then it can not be operated, 30seconds later, it will be power off.
2) Under power off mode, press power off/on button, the blue light keeps on and the red light will twinkles two times then off, indicating it enters standby mode.
u Recording Video and Audio
1) Under standby mode, press record/save button one time, the blue light keeps on and the red light will be twinkling, indicating that it is recording audio & video
2) Press record/save button again, the red light is off and the blue light keeps on, it stops recording and saves the data.
u Voice control recording
1) Under standby mode, press switch button, it will switch to voice control recording mode, the blue light keeps on and the red light twinkles quickly. It enters standby mode of voice control recording.
2) When the voice is higher than 60DB, the blue light keeps on and the red light twinkles slowly. It starts recording automatically.
3) Without voice or not up to 60DB, the device will be back to the standby mode and save the data.
4) If it records for 2 minutes, and the voice outside is also higher than 60DB,the device will last recording.
u Switch off
Under any mode, push power on/off button for several seconds, the lights are off, indicates it is power off.
In the following circumstances, the camera will save the data and power off.
1) Lacking of electricity when recording: the camera will save the data automatically and power off.
2) The memory is full: the lights twinkles for short time, then the camera will save the data and power off.
u Retting
You need to reset the device when it doesn’t work because of error operation. Just press the reset button with the clip once, the device will be as good as original.
u Used as a web camera
1) Install a driver in the user manual CD, the name of driver is “SPCA1528 PC Driver.exe”,Follow the installation steps to complete installation .
2) Switch on the device then connect to the computer. A standard video equipment will appear on the computer scream, then the device can be used as a webcam.
3) Under power on or off mode, connect the device to the computer by USB cable, the mode is USB mode, now it can be switch it to webcam mode.
u Charging
1) Under power off mode, connect the camera to the computer by USB cable or charged by a charger, the red light keeps on and the blue light is twinkling, indicating it is being charged. The blue light stops twinkling and the red light keeps on, indicating it is full of electricity.
2) When it is lack of electricity, the device will enter the protective mode directly, it can not be switched on. Now please charge it.
u Playback
After recoding, connect the camera to the computer by USB cable, click the removable disc, and select the record files and double click, then the files can be played in the computer. Before connecting please make sure the computer has been installed the related playing software.
u Setting Time
1) Connect the camera with computer
2) Create a new “.TXT” file in the root of the disk of the camera, then rename it “TAG”
3) Open the “TAG” file, edit the time in the file. (for example: DATE,2009/12/12 then change a line and edit time12:12:12 ), save this file, copy it to the root disk and exit, after that the time is set successfully
4) When starting the camera again next time, the time will be simultaneous as the time file.
u Attention
1) When recording, if it is lack of electricity, the device will save the data before power off;
2) When every recording, start or stop cyclely recording every time , the device will set a new video file;
3) Please use it in the environment with enough light, and keep the device vertical and stable, and keep it far away from the view more than 50meters.then it can get a best recording.
4) It needs some time to save the data, so do not operate it repeatedly when saving data. Otherwise the data cannot be saved smoothly, or make the data incomplete.
5) The device built-in high capacity polymer lithium-ion battery, no remember function, can be rechargeable. In the first five usage, please charge it when it is power off, can charge it to saturation. Then can activate the max capacity and get the standard time.
6) Please copy or shear the video files to the computer then play them. If play the video files in the device directly, it may be played un-smoothly because the data is too large.
- Previous: User Manual of Button Camera
- Next: User Manual of Tie Camera
