
Download
Contact Us
 Telephone:+860755-89505873
Fax:+860755-89504913
After-sales department:
+860755-89505873-8030 Ms Leung

- 413958458

- 13926598885
Users Manual
User Manual of Tie Camera
Source:未知
Writer:admin
Time:2012-10-10 09:58:45
Click:Loading...
User Manual of Tie Camera
l Product Accessories
● Tie camera ● USB cable ● Remote Control
● User manual CD ● Charger
l Picture & Buttons
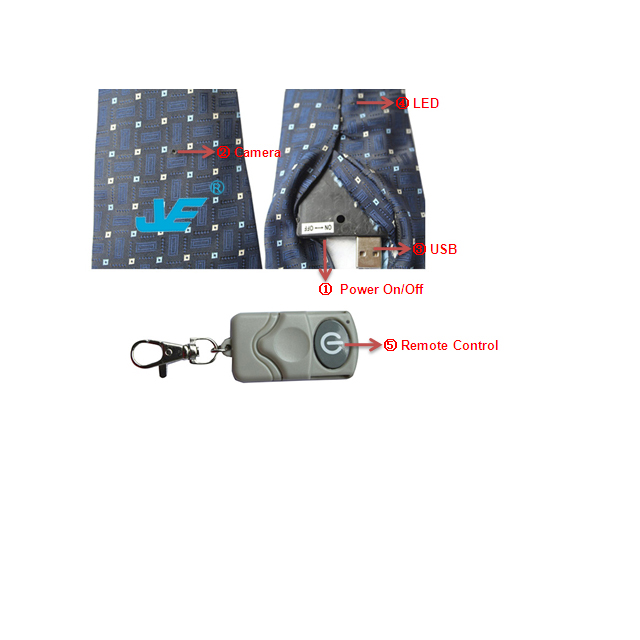
1. Power on/off 2. Camera 3. USB Port 4. LED 5.Remote Control
l Technical Data
1) Functions: recording video and audio by Remote Control, USB drive
2) Video: AVI, 720*480 resolution
3) Internal Memory: 2GB/4GB/8GB
4) USB: 2.0(Hs)
5) Charging time: 4-5 hours
6) Battery use time: built-in Li battery, 3-4 hours
7) Operation systems: No need for driver installation if the operating system is Windows ME/ 2000/ XP/ VISTA or above (Wndows98 is excepted)
l Operation
l Switch on
After opening zip of tie, push the power switch to “ON” position, the camera comes to power-saving mode.
u Recording video and audio
1) Press the remote control once, the green light blinks, 2 seconds, green light turns off, indicating that the camera is recording video and audio.
2) Press the remote control once again, the green light blinks once and then turns off , the video saved and the camera comes to standby mode.
Attention: when pressing the remote control once for recording, the tie camera shakes for 3 seconds then stops, indicating it is recording.
When press the remote control once again, the camera shakes 3 times (1 time each second), then stops.
u Switch off
1. Push power on/off button to “OFF” position under standby mode or recording mode, all lights turn off and the device will stop working.
2. Press the remote control for several seconds under recording mode to power off.
Attention:
1. Under recording mode, the file cannot be saved if turning off the camera directly.
2. To save the time set for the video, just power off by pressing the remote control, if by switching the power off button, the time of the video cannot be saved, and it will back to the Default time.
u Charging
Under power off mode, connect the camera via USB with the charger, the green light of the charger will turn on. The green light turns off when it is fully charged.
u Playback
After recoding, switch on the camera, at the standby mode, connect the camera to the computer via USB cable, then the files can be played in the computer. Before connecting please make sure the computer has been installed the related playing software.
u Setting Time
When using the device for the first time, you can set the time of video as follows:
The first line: [date]
The second line: 2009/12/12
The third line: 12:12:12
Create a new names “TAG” txt. File, then copy the file to the root of the disk of the camera. When starting the camera again next time, the time will be simultaneous as the time file.
Attention:
To save the time set for the video, just power off by pressing the remote control, if by switching the power off button, the time of the video cannot be saved, and it will back to the Default time.
Attention
1) When the device is lack of battery when taking video, the system will save the video data first, then shut down automatically.
2) When taking video continually, the system will automatically generate a new video file after each operation.
3) As the device has built-in high-capacity polymer lithium battery, so it has a memory effect .We advise in the first 5 times of usage, charge the battery fully after the battery is out of use, so that the battery can work with its max working hours perfectly.
