
Download
Contact Us
 Telephone:+860755-89505873
Fax:+860755-89504913
After-sales department:
+860755-89505873-8030 Ms Leung

- 413958458

- 13926598885
Users Manual
User Manual of Real Lighter Camera
Source:未知
Writer:admin
Time:2012-10-10 09:45:50
Click:Loading...
User Manual of Real Lighter Camera
l Product Accessories
● Lighter camera ●USB cable ● User manual CD
l Picture & Buttons
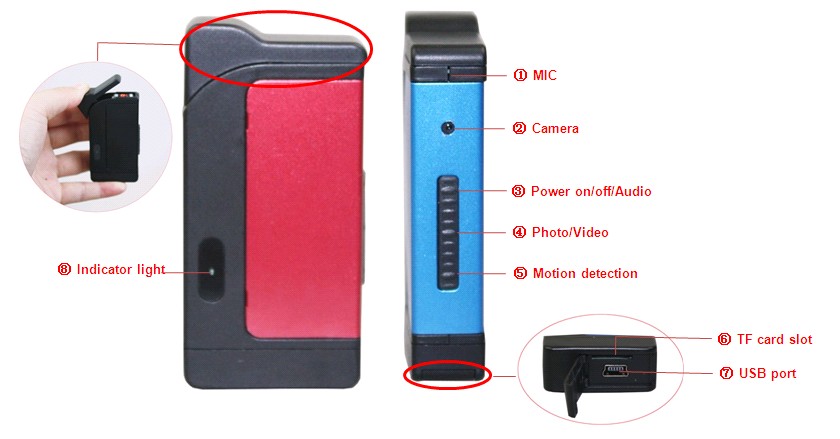
1.MIC 2.Camera 3. Power on/Off /Audio 4.Photo/Video
5.Motion detection Button 6. TF Card Slot 7. USB Port 8.Indicate Light
l Technical Data
This product is the first type real fire lighter, vibration prompt, motion detection high definition digital video recording, audio, photo taking and record the video when charging, web camera, automatic cycle record video high definition lighter camera. This product has the characteristic of simple operation, mini and fashion appearance, beautiful and practical, easy to carry, it is helpful tool for family
security, education, ordinary life, etc, it enjoys tremendous popularity.
1) Main function: recording video and audio at same time, taking photo, recording audio alone, motion detection, web camera, webcam, cycle recording, USB drive
2) Video format: AVI, 720*480
3) Photo format: JPEG, 1280*960
4) Audio format: WAV
5) External memory: micro SD card 2GB-8GB,Max 32GB
6) USB interface: 2.0
7) Charging time: 2-3 hours
8) Using time: about 2 hours
9) Recommend player: Kmplayer, Mplayer, ect which supports various media player format
10) Operation systems: No need for driver installation if the operating system is
Windows ME/ 2000/ XP/ Vista or above (Windows98 is excepted)
l Operation
u Insert the card
Insert Micro SD card or TF card into the slot before power on; if there is no card insert, after power on 5 seconds, red light flashes 3 times then automatically power off.
u Switch on
Under power off mode, press Power on/off/audio button for some seconds, red and blue light turn on together, the device shock, after stopping shocking, blue light turns off, red light stays on, the device enters into standby mode.
Attention: under standby mode, if no any operations in 3 minutes, the device will
power off automatically.
u Recording audio
Under standby mode, press Power on/off/audio button shortly, the device shock once, blue light flashes 3 times then turn off, the device into recording audio mode; short press the Power on/off/audio button again, the device shock once, audio file is saved, red light keeps on, it back to standby mode.
Press photo/ video or motion detection button, blue flashes 6 times then turn off, indicating the device is under recording audio mode.
u Taking photo
Under standby mode, press photo/ video button shortly, red light and blue light turn on, one photo is taken and saved, after taking photo, the device shock once, blue light turns off, red light keeps on, it back to standby mode.
u Recording video
Under standby mode, press photo/ video button for some seconds, the device shocks twice, red light flashes 3 times then turns off, it starts recording; short press photo/video button, the device shock once, red light keeps on, means stop recording and save video, it back to standby mode. Press power on/off /audio or motion detection button shortly, red flashes 6 times then turn off, indicating the device is under recording video mode.
Attention:
1. When device is recording the video, it will automatic save a video file every 30 minutes.
2. When the memory card is full, the device will delete the first video file to cycle recording.
u Motion detection
Under standby mode, press motion detection button shortly, the devoice shocks 3 times, red light and blue light flashes 4 times then turn off at the same time, the device enters
into motion detection standby mode; blue light flashes once, the device begins recording
video automatically. Press motion detection button once again, device shocks once and stop motion detection, red light keeps on, the device back to standby mode. Press power on/off /audio button or photo/ video button shortly, red light and blue light flashes 3 times then turn off, indicating the device is under the motion detection mode.
Attention:
1. When recording the video, device will automatic save a video file every one minute.
2. When the memory card is full, the device will delete the first video file to keep cycle recording.
u Webcam
This equipment can be used as a webcam, before using it ,you must install software drivers STK02N 2.3.exe in the CD.
Under power off mode, keep pressing motion detection button, connect the the device with computer via USB cable, there will be a standard video equipment on computer, click this equipment and use it as a PC camera.
Attention: Windows 7 cannot support this software drivers.
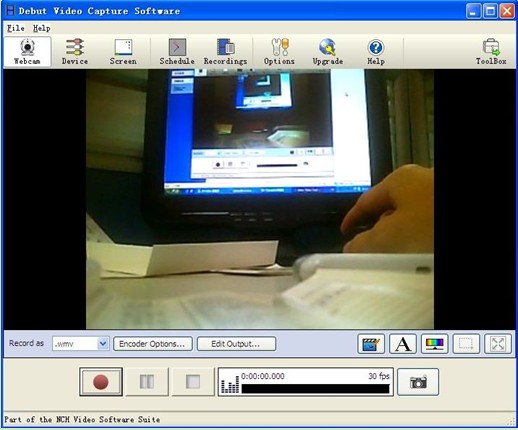
u Computer record video and take photo
Under the webcam mode, click the file in the CD(CCYCR camera assistor or Debut.exe Drive )in user manual CD, choose the location to save recording video file. Click the button of beginning recording video to begin recording, the device is into video recording mode. Click the button of stopping recording video to stop record the video and
Under standby mode, press photo/ video button for some seconds, the device shocks twice, red light flashes 3 times then turns off, it starts recording; short press photo/video button, the device shock once, red light keeps on, means stop recording and save video, it back to standby mode. Press power on/off /audio or motion detection button shortly, red flashes 6 times then turn off, indicating the device is under recording video mode.
Attention:
1. When device is recording the video, it will automatic save a video file every 30 minutes.
2. When the memory card is full, the device will delete the first video file to cycle recording.
u Motion detection
Under standby mode, press motion detection button shortly, the devoice shocks 3 times, red light and blue light flashes 4 times then turn off at the same time, the device enters
into motion detection standby mode; blue light flashes once, the device begins recording
video automatically. Press motion detection button once again, device shocks once and stop motion detection, red light keeps on, the device back to standby mode. Press power on/off /audio button or photo/ video button shortly, red light and blue light flashes 3 times then turn off, indicating the device is under the motion detection mode.
Attention:
1. When recording the video, device will automatic save a video file every one minute.
2. When the memory card is full, the device will delete the first video file to keep cycle recording.
u Webcam
This equipment can be used as a webcam, before using it ,you must install software drivers STK02N 2.3.exe in the CD.
Under power off mode, keep pressing motion detection button, connect the the device with computer via USB cable, there will be a standard video equipment on computer, click this equipment and use it as a PC camera.
Attention: Windows 7 cannot support this software drivers.
u Computer record video and take photo
Under the webcam mode, click the file in the CD(CCYCR camera assistor or Debut.exe Drive )in user manual CD, choose the location to save recording video file. Click the button of beginning recording video to begin recording, the device is into video recording mode. Click the button of stopping recording video to stop record the video and
save the video file into the set file.
Attention: the format of video is .asf. The resolution: 320*240, the video file has no sound; the format of picture is .bmp, the resolution ratio:320*240
The picture of setting as fellows:
u Reset
Under incorrect operation or a certain reason, the camera may stop working, you need to reset the device.
Press power on/off / audio button and photo/video button together to reset, then the camera is under power off mode.
Attention: when the device is working and reset the device directly, the video will not be saved.
u Switch off
Under standby mode, press Power on/off /audio button for some seconds, the device shock, the red light flashes 3 times then turns off. The system will save the file before switch off.
u Charging
Connect the USB cable with the camera and computer or charge. When device is under the charge mode, the device’s blue light keep flashing. blue light keeps on when the device is full charged.
Attention: If the device is of low electricity, red light flashes 3 seconds, the video file will be saved automatically before shutting down.
u Playback
Under any mode, insert the device into the USB interface of computer, there will be a moveable disk shown on computer, click the disk, choose the video file and click twice to play the video in the computer.
Attention:
1.It is suggested to copy or cut the video file into the computer hardware before playing the video, if you play the video file in the memory card built-in the device, maybe for the large data, transmission can't work normally, this will lead to not fluent playing back.
2. Ensure that computer has been installed player software.
3.Insert the device into computer to read data, the device shocks once.
u Setting time
We add the soft of showing the date and time in picture and the video file, the setting methods are as fellows:
1) Connect the device with computer.
2) Insert the user manual CD, then click the software “ time setting tool V 2.0” in the CD.
3) Pull the device out from computer.
4) The time of taking photo and recording video is same as the computer time; if you need change the time of device, just change the computer time.
l Attention
1) Can’t switch on: check if the battery has enough power, if not, please charge it; or reset and switch off the device, switch on again.
2) When the device is lack of the storage space, blue light flashes quickly for about 3 seconds then save the video file automatically and power off.
3) Connecting computer: depend on the difference of computer configuration and the system, the time of reading hardware is a little different, while connecting, do not do any operation for do not influence the computer read the hardware; if the device cannot be recognized by computer, please check the computer system, driver, USB port, USB cable, then reconnect.
4) Please use the device under the full of light environment, keep the device vertical stability, keep the distance before the goods which you recording, could be get the best video file.
5) As the devise has built-in high-capacity polymer lithium battery, so it has not a memory effect, but could be charge when using. We advise in the first 5 times of usage, charge the battery fully after the battery is out of use, so that the battery can work with its max working hours perfectly; to keep its max working hours perfectly, please keep charging for 30 minutes to 60 minutes when the indicator light shows the full charge.
